
For this week's three day marathon, my theme is miscellaneous food and I chose behind the scene shots of my food pictures . As I mentioned last week, I was going to skip this Month’s marathon but this theme forced me to do it. I was nervous to take it up as I am still taking baby steps in food photography. But I am glad I did as it was a good exercise to self-assess my skills. When I look back at my pictures from my early blogging days about 6 years ago and even pictures taken 2-3 years ago, I have come a long way!! But I still do struggle with styling and taking picture in certain scenarios. Again, I am no expert in this field and this is how I shoot my food pictures.
Behind the scenes of a food pictures is a subject that can be as narrow or broad as one wants it to be. When I first read the theme and for the first 1-2 weeks after signing up for the theme, all I could think of was plated and styled food ready to shoot, the angle of the camera and the source of light. I was thinking inside the box and I was scratching my head trying to figure out how I was going to do three posts on this subject? There is only ‘n’ number of ways I could turn, shift and play with the position of the camera.
Over the July 4th weekend we flew down to Las Vegas and that flight from New York to Vegas was one bumpy flight! I usually am not airsick but on this flight I was afraid I might be. I just closed my eyes to relax and was thinking about this theme and blog, bingo there was a flood of ideas overflowing and I immediately pulled out my iPad and started making a rough draft of this post. I jotted down the points and areas I want to discuss. Though the flight was unpleasant, the one good thing that came out of it was the brainstorming I did which gave me clarity and direction for these behind the scene posts. I did not touch that draft again until yesterday 🙁 , and I hope I do justice to the topic and cover what all I intended to share.
There are many components to food photography; the gear, backgrounds for the photos, props, styling & plating and last but not the least, post processing or the software used to edit the pictures. Before getting into more interesting topics of backgrounds, props and styling for food photography, let us talk about the boring topics first; the gear, settings of the camera and software for post processing.
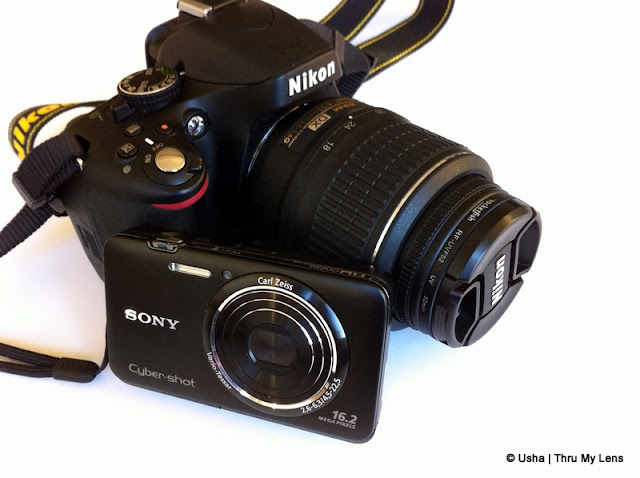
My Gear: When I first started blogging I used a Sony point and shoot (P&S) and in 2011 I upgraded to another point and shoot camera, Sony DSC WX9, which I still use to take step by step pictures. I got my DSLR, Nikon 5100 with 18-55mm f/3.5-5.6 AF-S kit lens in April 2012 but only started using the camera since June of that year. I liked the kit lens but there were limitations to it. This February I got a Nikon AF-S 50mm f/1.8 prime lens and ever since am using it for all my food photos. After using the prime lens, I don’t feel like using the kit lens anymore for food photography. I also use a tripod when taking almost all of food photos.
When I first got my DSLR, I did not like the pictures I took with it and felt my P&S took better pictures than my Nikon 5100. The main problem was/is my hands shake a lot when taking pictures with my DSLR. Then I got myself a tripod and things changed. From day 1 I did not want to shot in auto mode with my DSLR. But the challenge was figuring out the setting. I used to take pictures in auto mode and use those settings as a guideline to shoot in manual mode. I use to adjust those setting until the pictures turned out ok. It was so frustrating in the beginning that I also started looking at EXIF data of online food pictures for guidance. After few days I got a grip over the settings and never looked back or relied on auto settings for my food photography. Now I seldom use auto mode for food pictures.
Although I use a tripod, there are some limitations to it. It is very useful when playing with the settings but with the tripod there are limited number of angles one can shoot in. That is one reason I did not like my DSLR and felt P&S was better. With the P&S camera I could easily move the camera in any angle I liked. If one can hold the camera sturdy when taking pictures and do not need a tripod, then that is the best way to shoot pictures as it gives more flexibility in taking pictures in various angles, especially overhead shots.
Camera Setting: I always take pictures in manual mode. The 4 setting I consider and work with are aperture or f-stop, shutter speed, ISO and white balance. When using an auto mode, camera takes care of all these setting and all we need to do is click pictures. Aperture, shutter speed and ISO gives us control over the exposure of the picture and these settings are also known as exposure triangle. If you are new to these terms, check Kankana's post on ISO, shutter speed and aperture. If one wants to shoot in manual mode, it is essential to understand these three setting and what they do. It took me a while to figure out how these settings work. Aperture, shutter speed and ISO gives us control over how much light we want the camera to use to process the image. I usually do not change ISO unless it is absolutely necessary and always keep it at a low value. On a sunny day where there is plenty of light, I usually stick to ISO 100. The higher the ISO number the brighter the picture becomes and ISO is very much useful in cloudy and dark conditions. However mind you, higher the ISO number, the grainier & noisy the image could get, that is if the number goes above 2000+. Although I do not change ISO that much, I do adjust aperture and shutter speed depending on the light and mood of the picture. These are the two setting I adjust the most to get the pictures the way I want and for the right exposure.
Aperture: In food photography, in my view, aperture plays a crucial role in how the food pictures look. The depth of field can be manipulated with this setting. I like shallow depth of field in my pictures where the focus is on the hero, the main food and rest of the objects (side dishes) in the frame are blurred. Also, shallow depth of field gives a nice dramatic drop back when shooting with back lighting. With this setting, smaller the number, wider the opening and more light is let in and vice versa. f/1.8 has a wide opening and lets in more light and f/10 has a smaller opening and lets in less light.

In the above pictures, for sabudana vada and fried fish I wanted to highlight the main food and blur the other side dishes and the backdrop. I took all these pictures in the same window and I did not want the city skyline in the images. In the third picture I wanted to focus on all the side dishes or at least wanted it to be identifiable. For the first two images I used aperture f/2.5 to blur the background and for the third picture I used f/3.5. In the first two pictures, look how skyline is blurred and makes a nice backdrop.
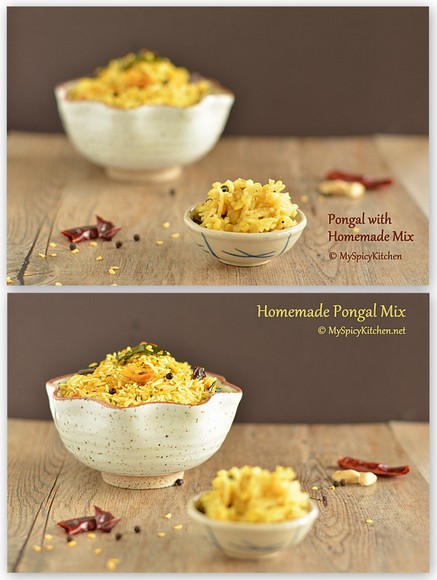
For shallow depth of field images, the hero of the picture can be highlighted by focusing on the hero of the picture. In the above diptchy both the picture were taken on the same day with the same settings. In the first picture the focus was on the tiny bowl of cooked pongal to highlight it and to blur out the bowl of pongal mixture in the back. In the second picture the focus was set on the bigger bowl of pongal mix to highlight it and to blur out the the small bowl of cooked pongal.

Shutter Speed: as the name suggests it is the speed at which the shutter of the camera closes and amount of time the sensor is exposed to light to create an image. Shutter speed, just like aperture can be used to control exposure or light required to process an image. The other factor that could influence shutter speed is motion. If one wants to photograph motion, it is this setting that needs to be adjusted.
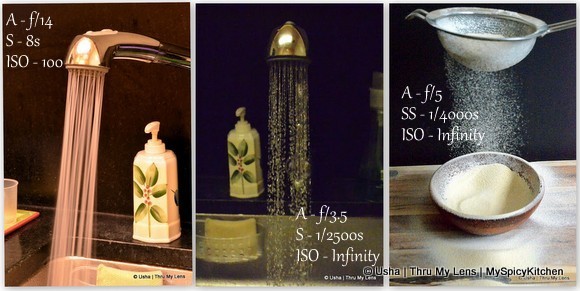
Look at the shutter speed (S) in the above pictures. In the first picture to capture the pressure of water the shutter was open for 8 seconds. And for this picture, a tripod is a must as one has to hold the camera sturdy for 8 seconds without shaking. The second and third pictures are of slow motion or freezing motion where shutter was open for a very shot period, 1/2500 sec and 1/4000 seconds respectively. Also look at how the aperture setting was adjust for right amount of exposure. These pictures are from last year when I used my kit lens.
White Balance: The 4th element that is important and that I adjust regularly is White Balance (WB). I only understood the significance of white balance last fall when I was photographing fall colors on a cloudy day. Until then I used to use WB auto. I usually shoot indoors but always adjust the WB depending on the light outside. If it is a cloudy day, I use cloudy WB and sunny on sunny days. It usually works out fine but the only time I get confused is in the evenings before sunset. When taking pictures during that time, I try both sunny and cloudy setting on a sunny day and pick the best of the two images.
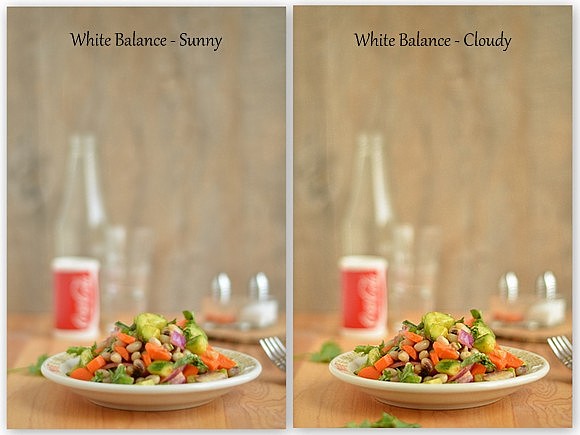
In the above diptych, both the images were taking with same setting except the white balance and of course a coriander leaf in front of the plate to indicate I used cloudy WB for that image. It was a partly cloudy day and when I started taking pictures, the sun had come out. I used WB sunny took some pictures and did not like some of the styling. By the time I changed the styling, it suddenly became cloudy. So the first picture was taken with sunny WB and the second with cloudy WB. Both the pictures were taken when it was cloudy outside. These two pictures were taken less than a minute apart and soon after I took the pictures it started pouring. I was glad I clicked my pictures before it became pitch dark because of the down pour.
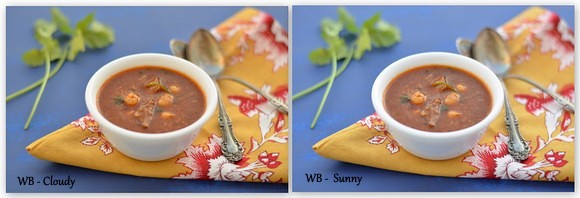
Above picture was on a sunny day just before sunset. I like both the images, one taken with cloudy WB and one with Sunny WB. In such cases I pick the picture that would better explain the mood of the picture.
What Setting to Use?: You must be wondering how these elements are related to the behind scenes of food pictures? Well, these settings have everything to do with how the final picture looks like. If I am doing a motion picture, meaning I want to capture motion such as chopping vegetables, churning buttermilk, tossing a salad or sifting flour, then I would focus on my shutter speed to get the desired action. If I am doing a still food picture and I want to focus only on the main dish and blur the side dishes, then I would work with my aperture. Bigger the f-stop, blurrier the photo would be. With aperture of f/1.8 the main dish will be highlighted and everything around it would be blurred and f/5 would have a less blurred side dishes than with f/1.8.
If one feels the manual setting is intimidating, then one can use aperture priority or shutter priority modes. With these setting one has to adjust only one setting f-stop or shutter speed and the camera will adjust rest of the settings. This is semi-auto mode and gives the flexibility of adjusting one setting depending on what one whats in a photo. If one wants blurred images, then aperture setting is the one to work with and for motion/action images, it is the shutter priority. I have never worked with these setting but aperture priority is on setting I want to work with as it works best for my style of photography where I like to focus/highlight the main dish and blur out the side dishes. Who knows, once i start using Aperture priority, I might never go back to the manual mode.. 😉
Post Processing / Editting: My P&S camera lets me adjust ISO and I think even WB but I never understood how these settings worked until I started using my DSLR. Another important aspect of food photography or any photography is post processing. If some of the settings could not be adjusted in the camera, that can be fixed during post processing or editing the photos using photo editing software. Once I upgraded to prime lens, I do very little post processing. I watermark, add titles to images (add text), sharpen the images and add a border. These are the basic edits I do to all my pictures. I use Picasa a lot and it serves my purpose. I also use GIMP once in a while. The other software I like is PicMonkey which is an online software. I use this a lot to add banners and text to images. All the fancy banners on my images are added in PicMonkey. There are many photo editing software such as Photoshop, Lightroom etc. Choose the one that you like the most. Also, apart from the basic edits; light, contrast, shadows can be adjusted during post processing. I might visit post processing again in the next two days if required. For now, happy clicking!!
This day in 2012: Rajma Pulao ~ Kidney Beans Rice


Renu says
Thanks for this detailed write up about camera settings. Those words white balance, shutter speed etc use to fright me. Now That I had to take a plunge and just hopped on to your site, as I knew you write about editing pics and food photography too. Thanks again. Very helpful.
Chef Mireille says
so helpful - I actually took a second set of photos now using the warm white setting at night- posting it tomorrow for my letter I post - the white balance adjustment is such a helpful tip
Varada says
Excellent post Usha, very well written. You have covered a lot of details in a single post and motivated me to try manual mode. I have not ventured past aperture priority mode. Never used WB setting either.
Vaishali Sabnani says
Very well written and explained Usha. I had joined a photography work shop where they taught all that you mentioned. .its just that one needs to have time and patience. .we are always racing against time and forget on the quality and work with quantity.
I have all these notes and reading your post felt terrible that I haven't used what I learnt.
Hope to get inspiration now;))
Priya says
I dont have words to explain how much i loved ur beautiful and very detailed post about food blogging,definitely would love to learn and very useful tips, a dream for a novice food photographers like me get to know more about this immense world.
Pavani says
Awesome post Usha. So much information and useful tips. Will have to come back and read in leisure to grasp the points.
Harini says
Excellent write up Usha. I need to read this few more times to get the concepts in 🙂
kurinji says
gr8 gr8 gr8 and awesome post....thank u so much Usha.....
Srivalli says
What an awesome post Usha, thank you so much for taking time to write in detail..I hope you take more trips..:)..with regards to your blurring effect of your skyline..what a marvellous job!..I wanted to ask about it many times, but kept forgetting..what a neat idea to blur and have that effect at the same time..Great post!