
After editing images in Lightroom (LR), it is time to share the images either online or print the images. Today’s tutorial is about exporting images to share online or for printing. Before getting into today’s topic, here are the tutorials from the last two days.
- Day 1: Introduction to Lightroom - Library Module & Develop Module.
- Day 2: How to edit images (RAW) in Lightroom.
Topics covered today are:
- Exporting Images
- Creating Text Watermark Presets & Graphic Watermarks Presets
- Delete Watermark Presets
- User Presets
- Crop Image
Click on any of the images for full view.
Export Images
Images can be exported from any module; library, develop and print are the modules I work in. Single or multiple images can be exported at a time. To export multiple images, select the images from the Film Strip or from the Grid View in Library Module. Once the image(s) is selected,
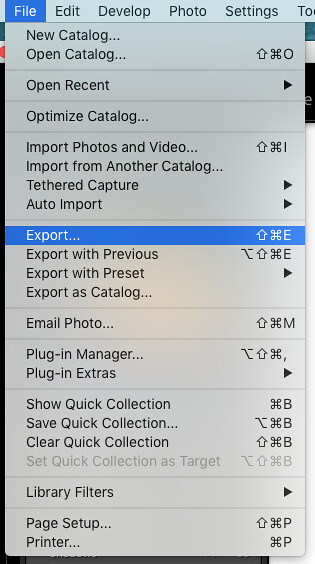
Go to File -> Export…
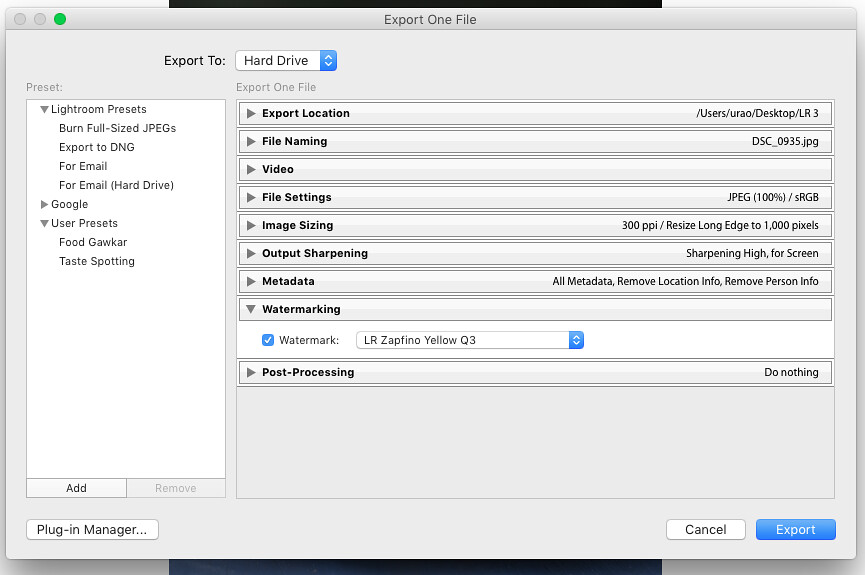
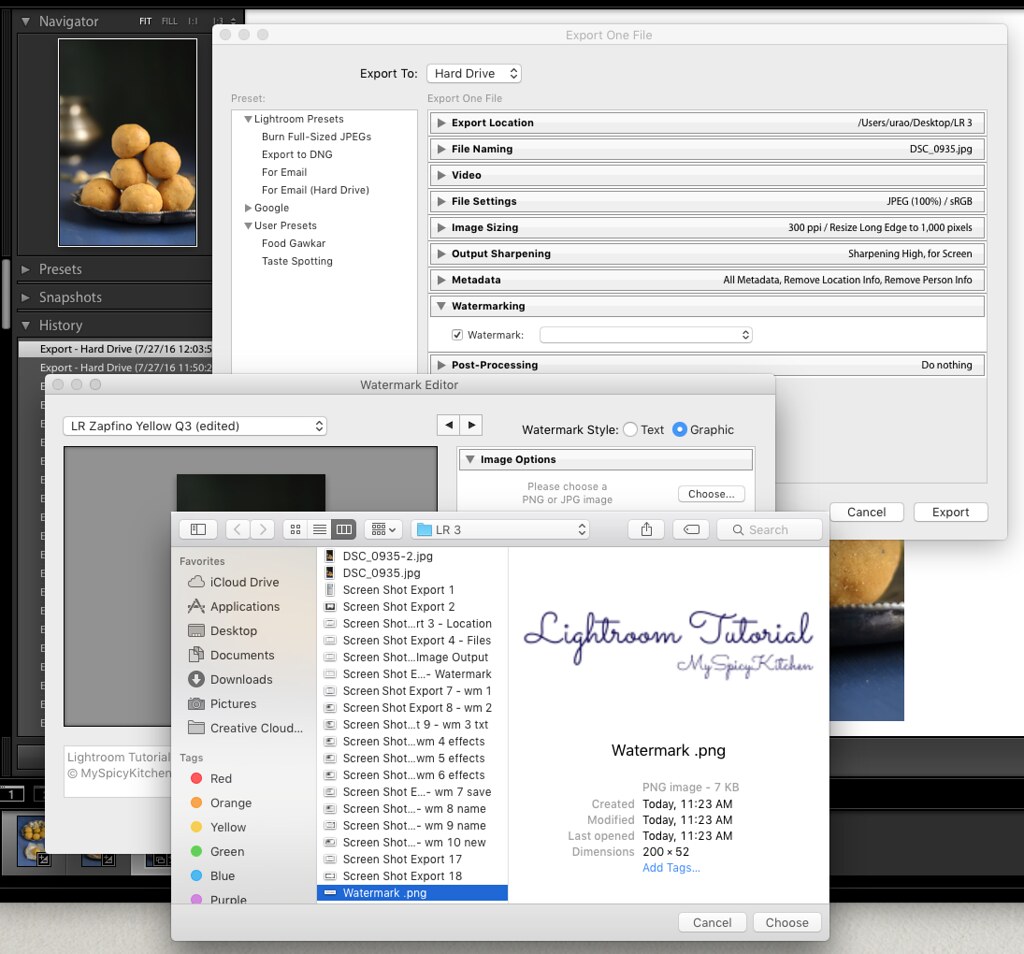
A popup menu opens. It has 9 various settings. I don't use all of those but we do need to set a few settings.
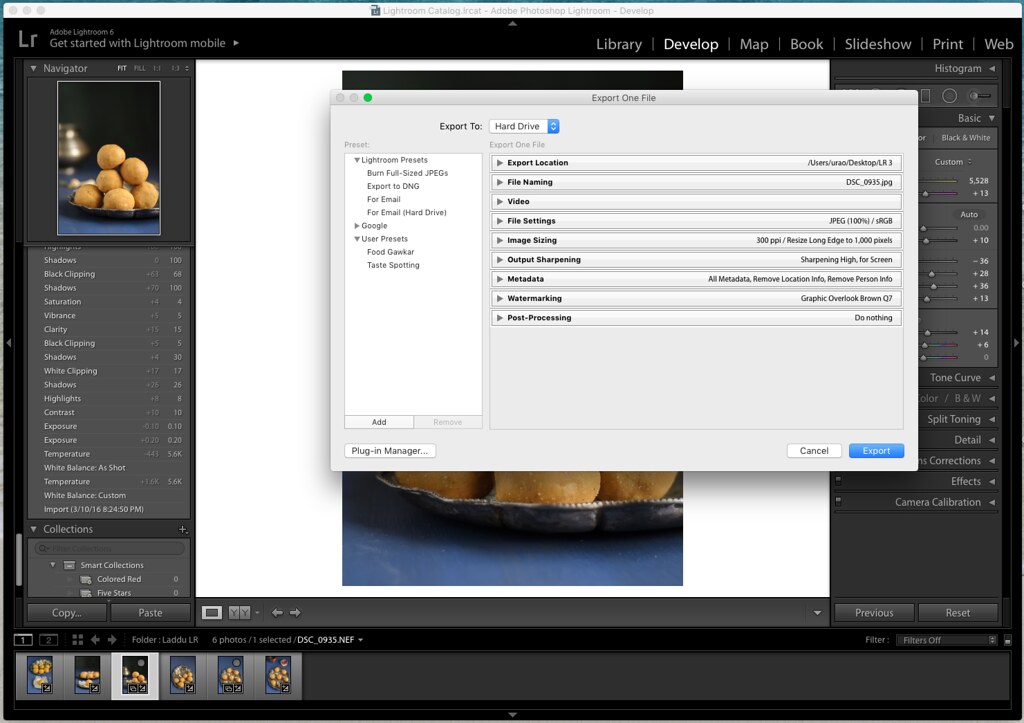
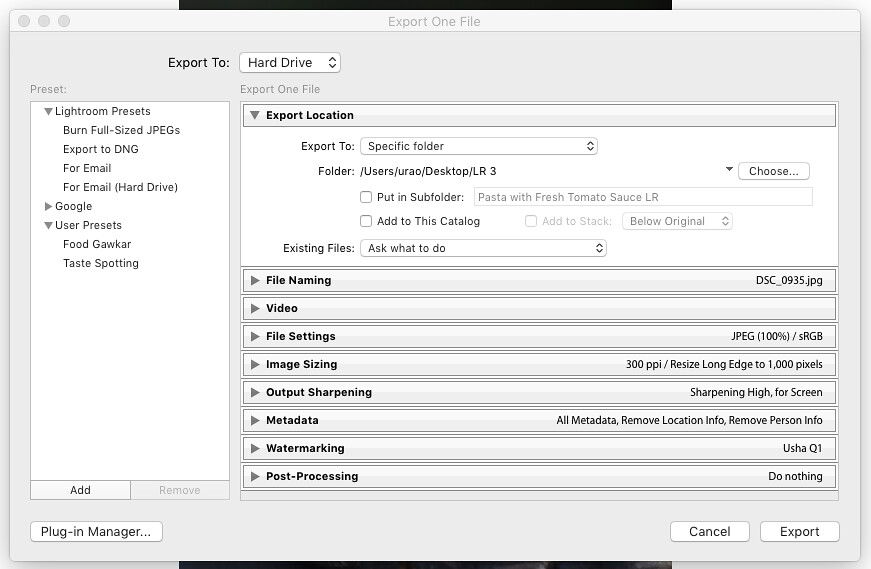
Export Location - Select the location of the file. I chose LR 3 for this tutorial.
Existing Files - I selected 'Ask what to do'. There are a few more options in the drop down menu. Select what works for you.
File Naming & File Settings - I usually leave the file name blank. I guess I could name it laddu.
File Settings -
Image Format - Select JPEG or any other format from the dropdown menu.
Color Space - sRGB for online uploads and ProPhoto RGB for printing.
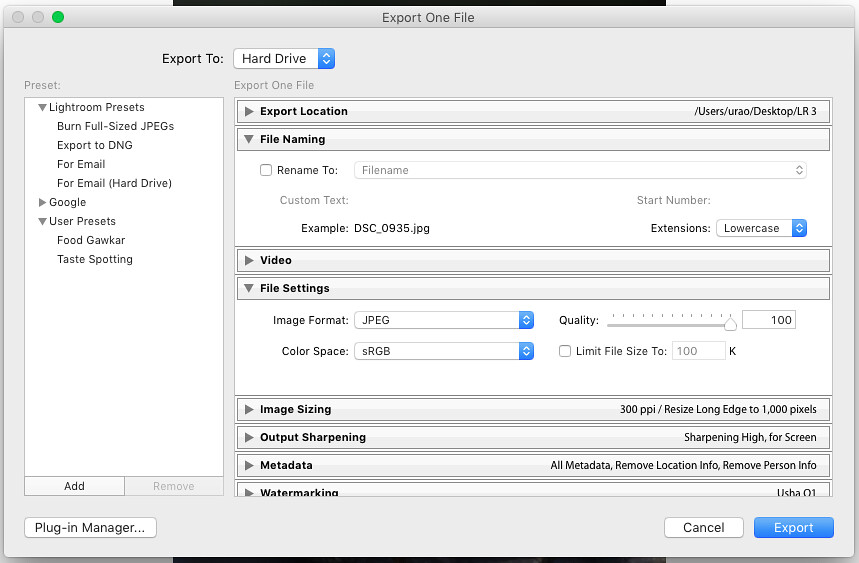
Image Sizing - Select the size of the image depending on where the file is going to be uploaded. I usually resize to 1000, as that will meet Facebook and Pinterest requirements.
Resolution - The rule of thumb is 72 for social media and online updates and 300 for print. I always leave it on 300.
Output Sharpening -Select Sharpen for screen.
Watermarking - Check Watermark and select the watermark to use for the image. Each time a watermark is used/created it is added to the dropdown menu. Click export. The files will be exported to selected folder.
Watermark Presets
How to Add New Text Watermark?
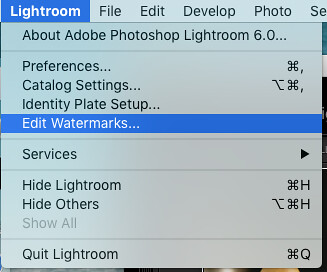
Text and graphic watermarks can be used when exporting images. In the Watermarking Setting, click the dropdown menu next to Watermark. Select 'Edit Watermarks'
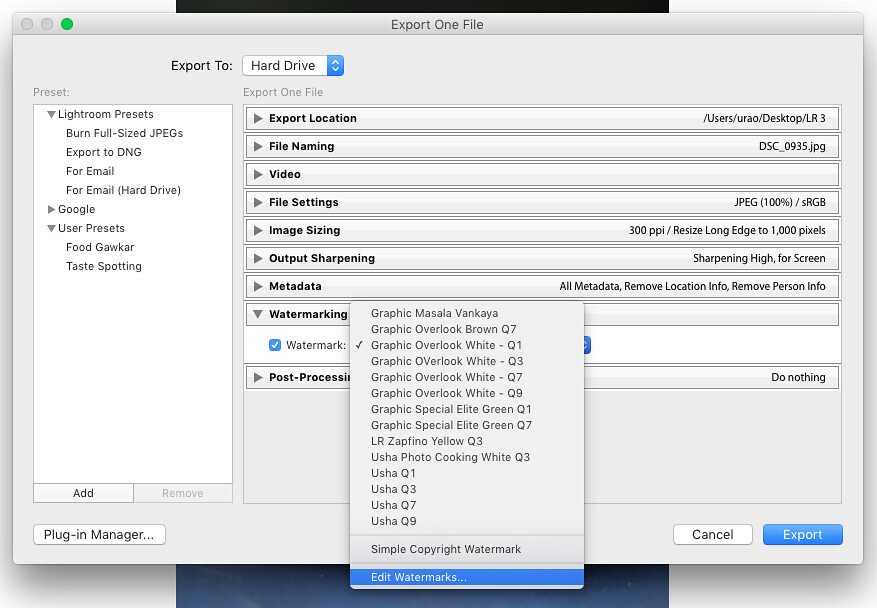
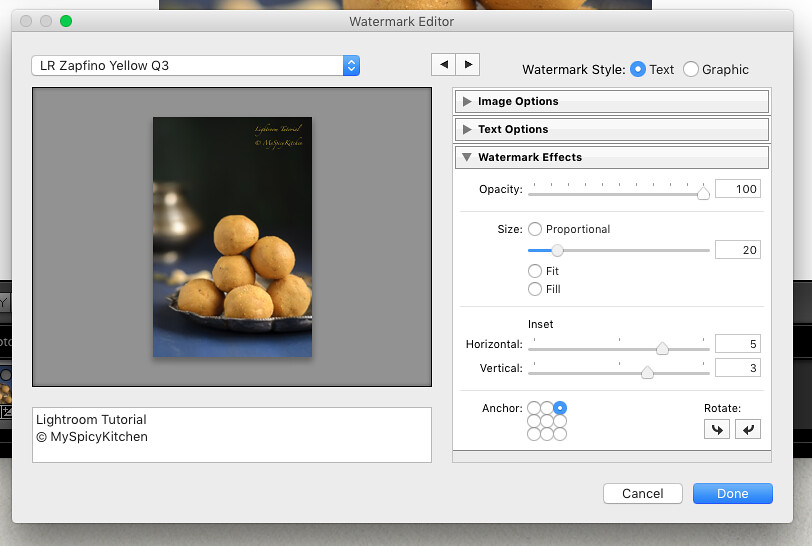
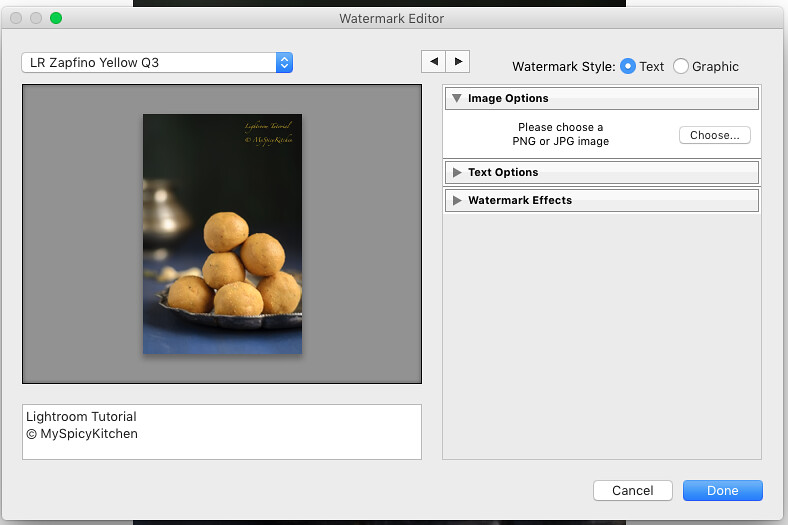
Below window ups up. It has the settings for the selected Watermark, which is Graphic Overlook White - Q3. This watermark is graphic and I want a text watermark.
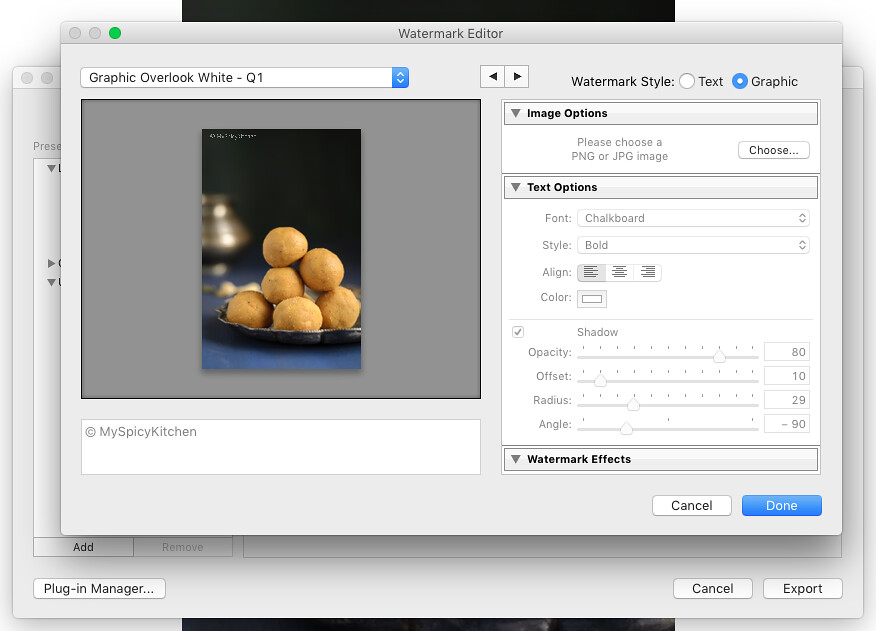
Watermark Style - On the right side of the window, select Text for Watermark Style.
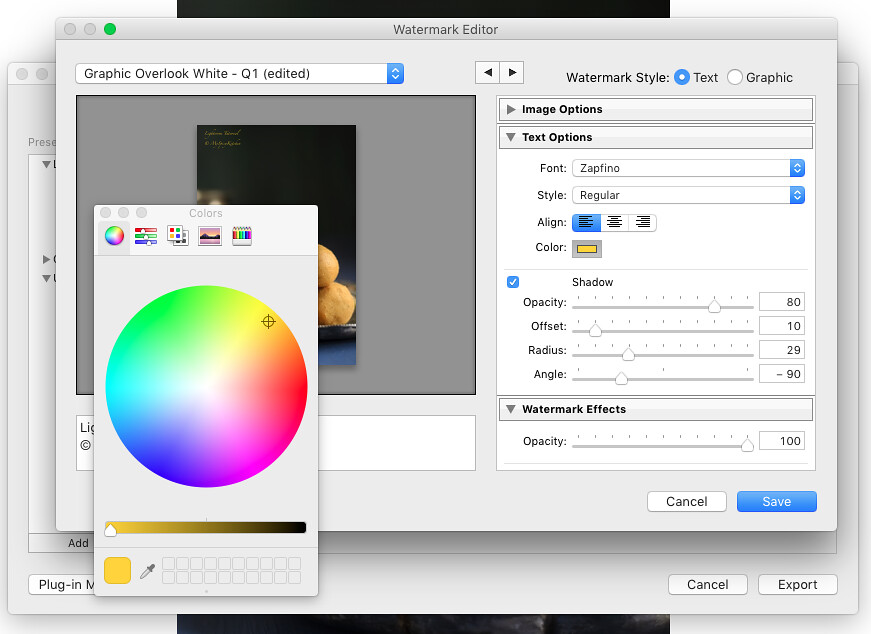
Text Options - select font type and color. For Shadow, play with the settings and adjust them. In the box below the image preview box, enter the watermark. In the above image, the text box has MySpicyKitchen as the watermark. That is the text I used last time I used text watermark. For this new watermark, I want to add another line, Lightroom Tutorial.
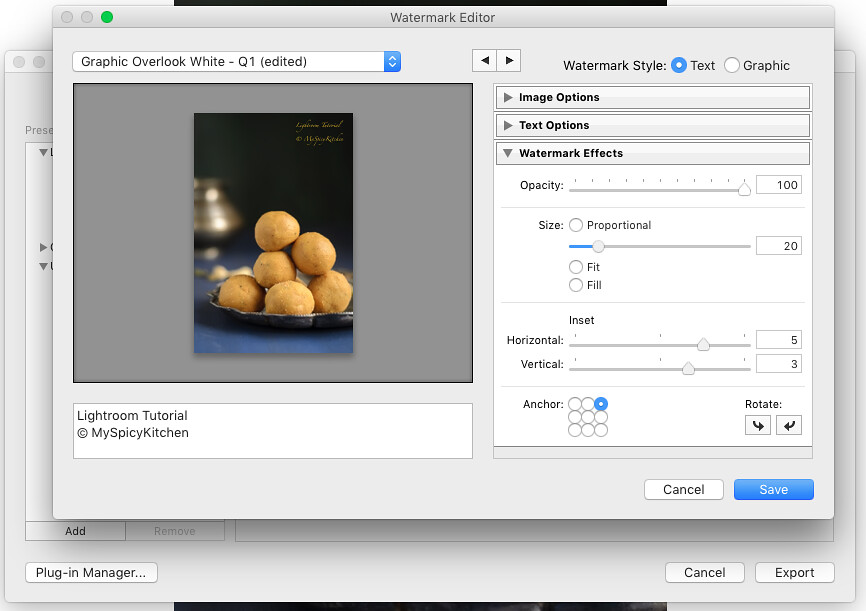
Watermark Effects - I kept opacity to 100.
Size - I picked proportional. In the preview image, can you see the watermark? I know it is tiny.

See what happens when the size is set to 'Fit'. See preview of the image in image preview box. Also see what happens when option 'Full' is selected.
Inset - move the horizontal and vertical sliders to adjust where you want the watermark on the image.

Anchor - Pick one of the 9 buttons for anchor. This is the position of the watermark. I want the watermark on the top left corner and picked the top right button. Now lets save the watermark.
From the dropdown menu above the image preview, select 'Save Current Settings as New Preset'. LR will create a new Preset with these new changes.
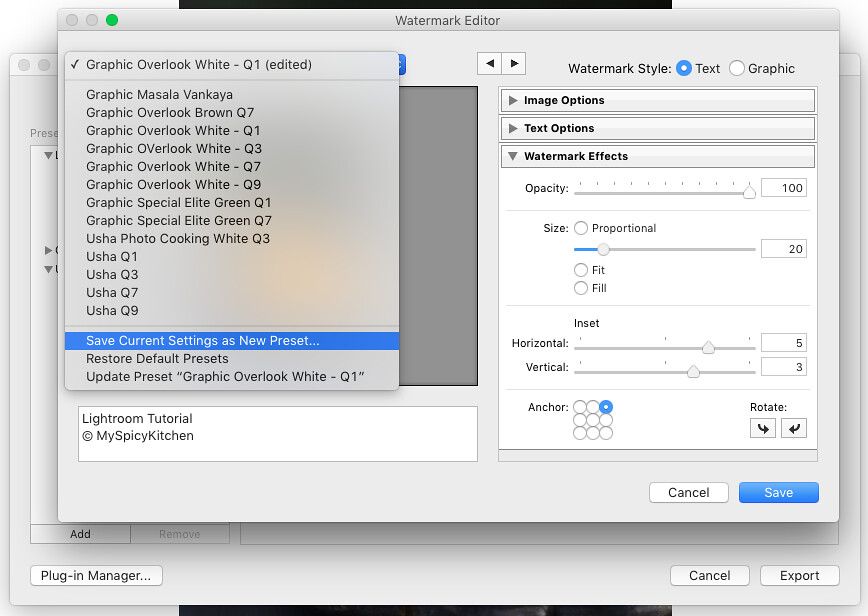
You will be asked to give a name to the preset.
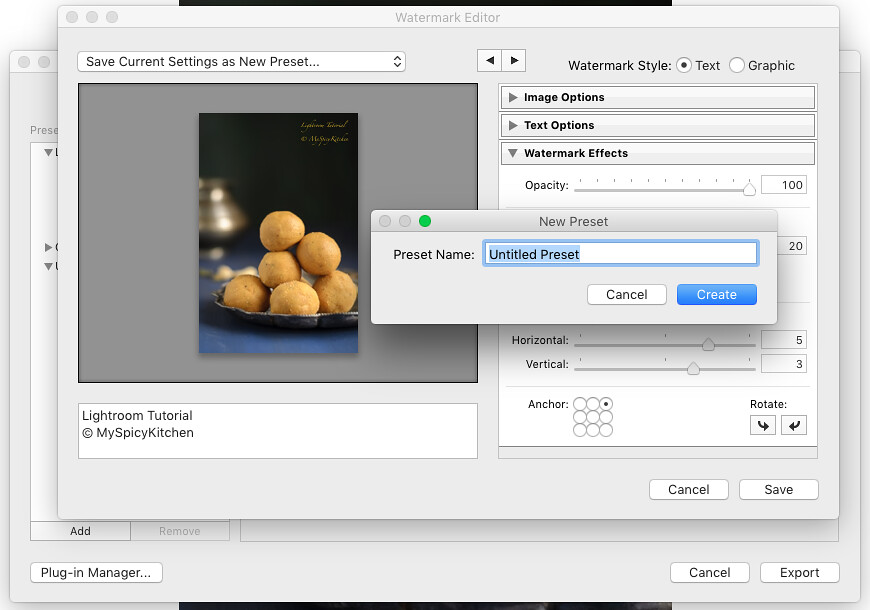
Give meaningful names to preset/Watermark. I usually name them based on the style, color and position of the watermark. This way, I know the color and position of the watermark. If my image has a dark background, I will avoid a dark font watermark. I also consider the position of the watermark. For this laddu image, I want my watermark on the top right corner and will look for all the preset watermarks that are named Q3. Remember we had to pick one position from the 9 radio buttons. I name them1-9 and top right is Q3 (quadrant 3) and bottom left would be Q7.
Once you click the Done button, you will be taken back to the export window and the new preset/watermark will the selected watermark for the exported image.
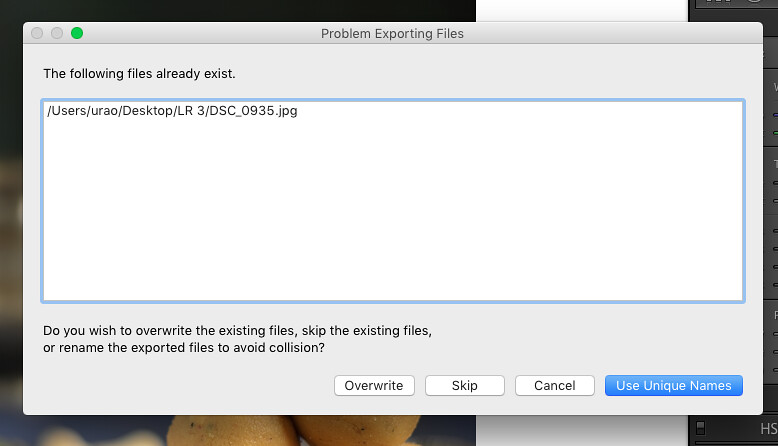
Remember, when selecting the export location, for Existing File, I selected 'Ask what to do'. If there is an existing file, I will be asked what to do. Looks like I already exported one image of this laddu. Select 'Use unique names'. The image will be exported with a file name suffixed with a number.
How to Add New Graphic Watermarks
One might ask what is graphic watermark and why would one want to use a graphic watermark? Well, if you do not like any of the fonts in LR or if you or a professional graphic designer designed a watermark that goes with your blog theme, then you want to use that watermark. Follow the same steps for text watermark as above, but pick graphic button for Watermark Style. You will be asked to upload the graphic. Here I created a graphic with difference font.
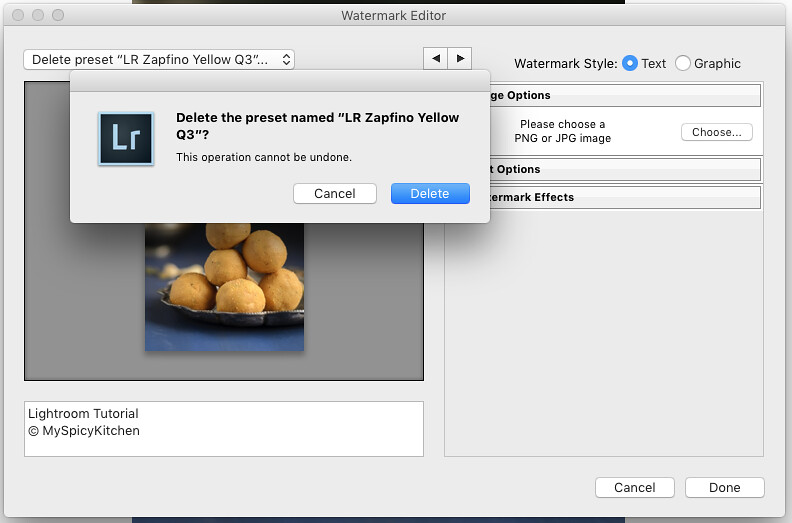
Delete Watermark Preset
We created couple of watermarks and I don't like them. I can leave it as it is but trust me, watermark list grows very fast. In fact I had more than 15-20 preset watermarks. This morning when taking screen shots for this post, I deleted the ones I don't use. To delete watermarks, go to Lightroom -> Edit Watermarks
Select the watermark from the dropdown menu.
From the same dropdown menu, this time select 'Delete preset
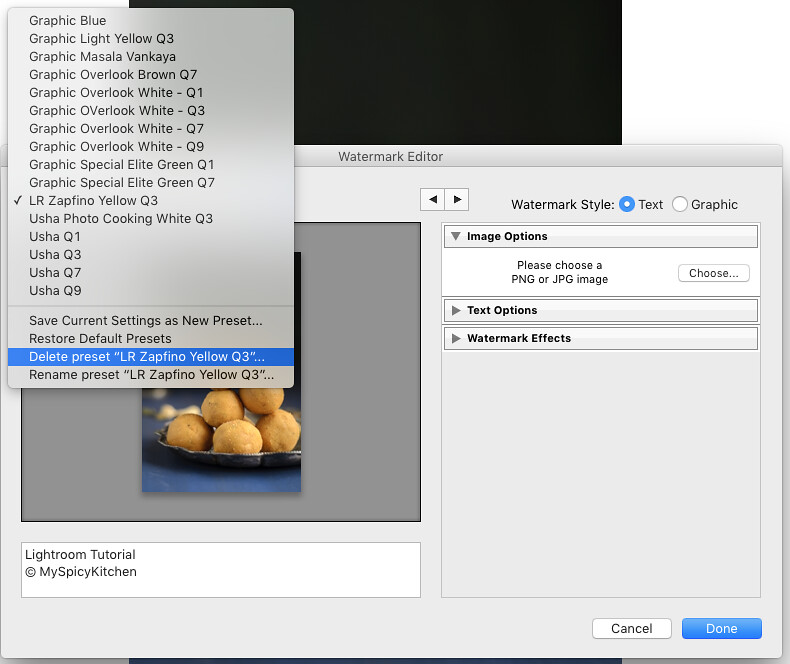
Click delete. Preset will be deleted.
User Presets
If you are a blogger, I am sure you upload your pictures to at least 2-3 social medias or submit your pictures to Food Gawkar or Taste Spotting. Each time you export an image, it has to be resized based on the where it is being uploaded. It is a pain to modify the settings each time we export. Solution to this is creating User Presets. In the picture below, on the left panel there are User Presets and I have presets for Food Gawkar and Taste Spotting. Now lets create one for Instagram.
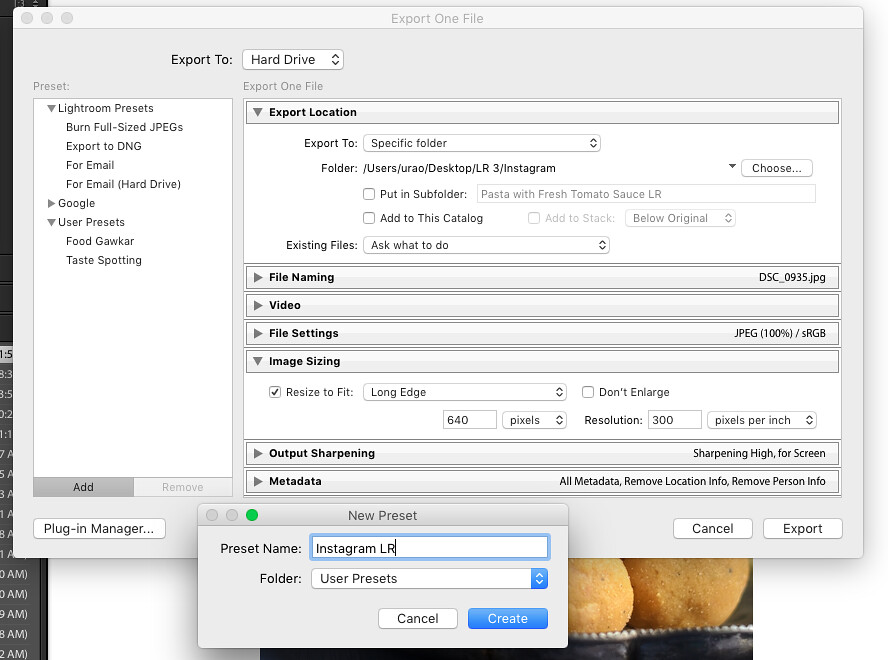
In the above screen shot, I set my folder location to Desktop/LR 3/Instagram LR. I want all my Instagram images in one folder.
Image Size - set it to 640. Instagram uses 640x640 size images. Remember to crop the image to a square. If you are not sure how to crop an image, check this.
Watermark - I don't use watermark for Instagram. Once all the settings are selected, select Add from the left panel.
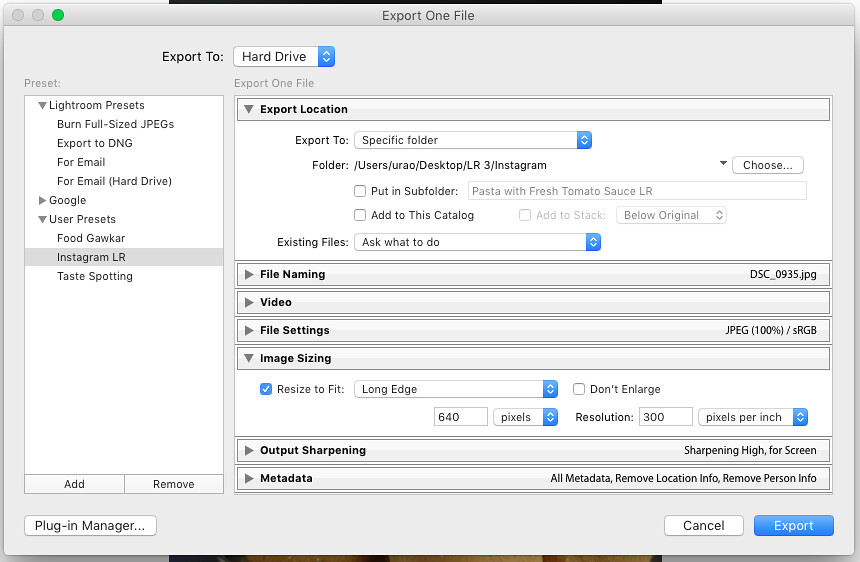
In the above screen shot, Instagram LR is add to User Presets. Whenever exporting images for Instagram, just select the preset and the settings for Instagram will show up. To delete the user preset, select the preset and click 'Remove'.
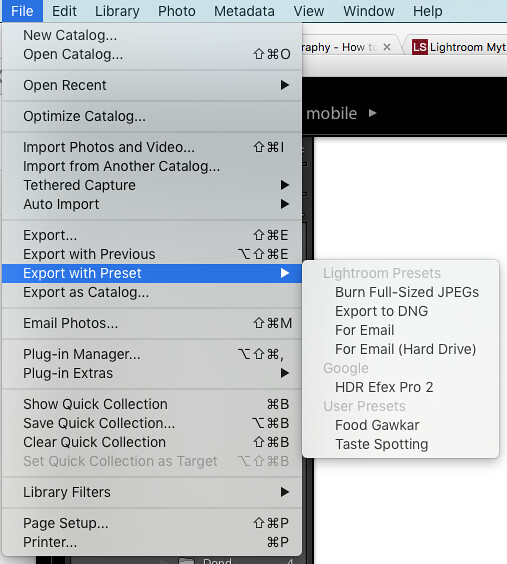
Export with Preset - If using presets, from file menu select 'Export Preset'. The image will be exported directly to the select location.
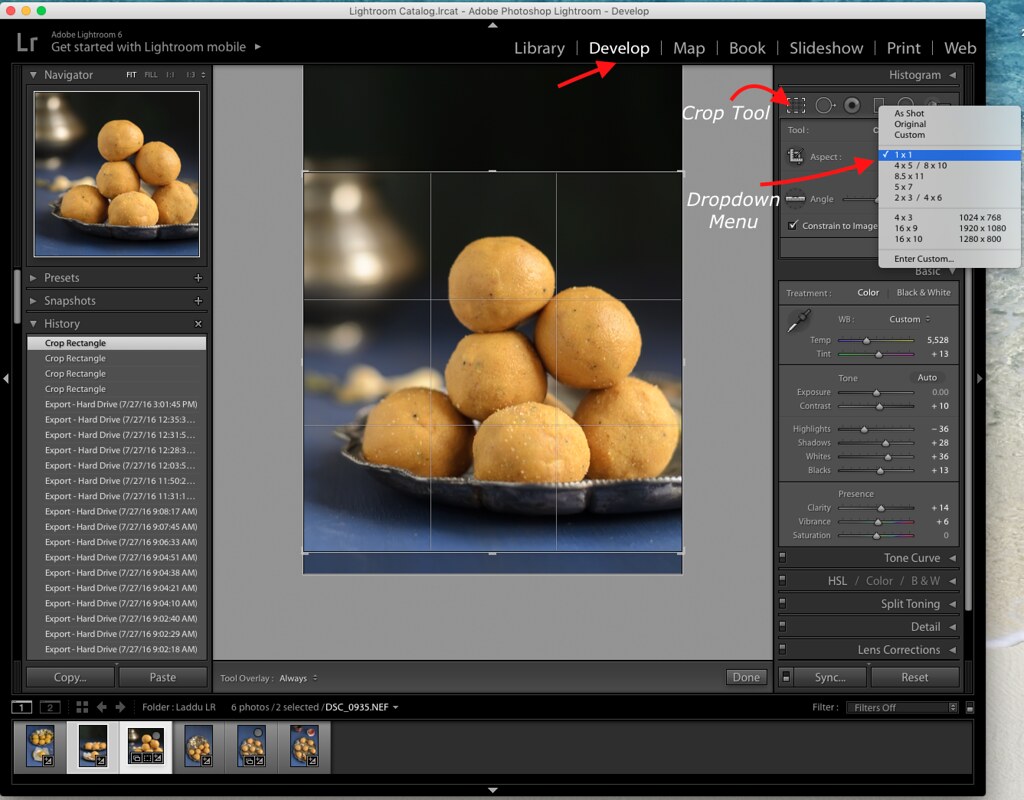
Crop Images
Use the crop overlay tool on the tool strip in Develop Module.
Go to Develop Module -> Crop Overlay -> select 1x1 from drop down menu -> adjust the image -> click crop overlay or enter in key board to finish cropping.
As I mentioned on the first day, I am a novice LR user and please let me know if there is a better way to do anything that I have shown in these tutorials. I hope these tutorials are useful and to be honest, ho boy, with the amount of time I spent on these tutorials, I could have drafted at least 6 - 8 recipe posts in the these last 3-4 days!! It was lot of work!!
This day in 2014: Food Photography - Lighting
Check out the Blogging Marathon page for the other Blogging Marathoners doing this BM#66
![]()


Pavani says
Awesome posts on LR Usha. Thank you for taking time and explaining everything in so much detail. Will be very useful for anyone using LR.
Priya Suresh says
Again a worthful post, thanks a lot for sharing with us.
Smruti | Herbivore Cucina says
Yet another wonderful post!! Lovely 🙂
srividhya says
what an elaborate post about LR.. Love it and thanks a ton for sharing.
Vaishali Sabnani says
Usha , I have not read a word of this post , i really need time to go through all the posts carefully, but I must say you rock !..its hard to do such elaborate posts and yes, you go and enjoy !..your exam is over :))
MySpicyKitchen says
🙂