My theme for this week is a special theme and I chose to do a tutorial on Lightroom. In fact, Valli added this theme just because I said I would do a tutorial if there is such a theme for Blogging Marathon (BM). Thanks Valli, for including this theme. If not for BM, I would have procrastinated doing this to eternity. This is more of my workflow in Lightroom than a tutorial. I am using Lightroom for the past few months and still learning.
Why Lightroom - Adobe products are expensive and I always wanted to learn Photoshop but it is an expensive software. That was the reason I didn't purchase nor consider owning the software until last year. I use to edit my pictures in Picasa and sometimes in PicMonkey and GIMP. I bought my DSLR about 4 years but started taking decent picture in manual mode in the last 2-3 years. In the last couple of years I have became comfortable shooting in manual mode, wanted to move out of my comfort zone and shoot in RAW. To edit RAW files, I needed a good software and I automatically turned to Adobe products. When looking at the prices, Lightroom looked cheaper than Photoshop and was confused which software to choose. I downloaded and played with in Lightroom 5 trial version for 30 days and then downloaded Lightroom CC, which also comes with Photoshop. Though it had Photoshop, I could not really work on it as this was just before my India trip in early December. After I came back from India I was in a dilemma whether to buy Lightroom 6 for $150 or subscribe to Adobe for $9.99 a month, which includes Photoshop CC and Lightroom CC. After lot of thinking I went with Lightroom 6. At times I still keep second guessing if I should have just subscribed to Adobe CC. Saying that, as of now I am pretty satisfied with Lightroom 6. The other reason I stuck to Lightroom is, research showed Lightroom is easier to learn and is a decent software to edit blog pictures. If one is looking into professional photography then Photoshop is a better option. Second, I am told there is a learning curve on Photoshop.
Coming to Lightroom, I still have not mastered the software and I use basic features that Lightroom has to offer. There is lot more to learn and explore. For the next three days, I shall share with you my workflow in Lightroom. Though I shoot RAW and edit mostly RAW images, even jpeg images can be edited. Once you start editing in Lightroom, trust me, you would not want to go back to Picasa or any of the other softwares in that league. Though I shoot in JPEG+RAW, nowadays I rarely look at my JPEG images. Initially I use to compare the photos I processed with RAW files with camera processed JPEG images and most often I found the RAW processed images better.
Why shoot RAW - One might ask why shoot in RAW when camera does the job for us when shot in JPEG. And what are RAW images? When we shot in JPEG, the camera does the editing and renders the image as it thinks is the best. With RAW files, we can develop the images as we like. Color resolution is better resulting in a better quality images. We have more control on how the final image looks like. RAW files save all the details of the image where as JPEG images are compressed and some details are lost. RAW files are similar to photo negatives of yesteryears. The downside is, RAW images are large and take up lot of space, and the images have to be processed before posting/print/ready to view.
Lightroom
Today I will give a brief intro to Lightroom(LR) layout, importing and deleting images in LR. Today's post is more for first time users of LR. I am assuming the readers have downloaded and installed LR. If not, got to Adobe website, purchase the software, download and install it. Lightroom 6 can be purchased from Adobe website or from Amazon, like I did. From what I have read, Lightroom 6 and Lightroom CC are the same.
Lightroom Layout
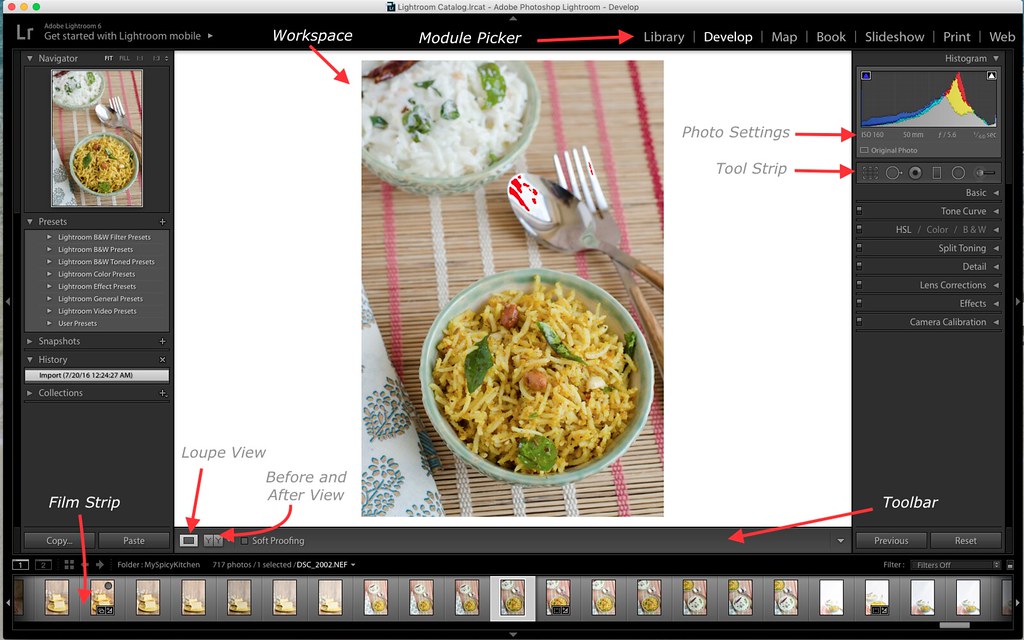
Open Lightroom. The layout of LR application has a left panel, right panel and a workspace. On top right is a module picker, right below the workspace (middle panel) is a Toolbar and a Film Strip right below that. Depending on the module selected, the content on left and right panels vary.
Module Picker - LR works on Modules. A specific set of tasks can be performed in a specific module. There are 7 modules and I work in Library, Develop and Print modules.
As the names suggest, Library is where images are imported and organized. Develop is where the images are developed or edited and Print module is where the images can be printed. Collages are also made in Print module.
Toolbar - Toolbar is right below the workspace and displays the controls. Controls on the toolbar depends on the module selected. Some controls are common to both library and develop modules.
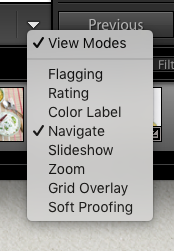
Add or remove controls from the toolbar from the popup menu that appears by clicking the inverted triangle on the right most corner of the toolbar. I shall talk more about the controls in respective modules.
Film Strip - This strip is below left, right and middle panel, right below Toolbar. It is a strip of images called film strip. Film strip displays thumbnail of images of selected collection, folder etc. Just above the images, there is information about the selected Catalog or Folder. When I took this screen shot, Catalog -> All Photographs was selected. There is additional information, such as number of photos in the selected Catalog or Folder, number of photos selected and the name of the selected photo. Click the image for large view.
Library Module - As the name suggests, this module is a collection of all images. This module is used for importing, organizing, sorting and selecting images. Click the screen shot for large view.
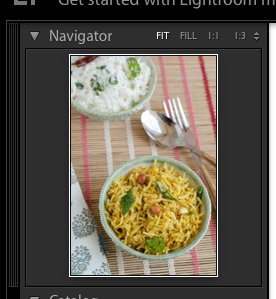
Left Panel - The left panel has Navigator, Catalog, Folders, Collections, Publish Services tabs. I don’t really check the Catalog and Collections tabs. I use the Folder Tab as that is where all my images are listed/stored in folders in an alphabetical order. I shall talk more about the Folder Tab when Importing photos. Navigate Tab displays a preview of selected image and also has options to zoom the image. I don't usually zoom the image in Library module but this comes very handy in Develop module when editing the images. Up Down arrow icon on the top right corner of Navigator panel has more options/ratios to zoom the image.
In the Library module screen shot, tabs on the left panel are closed. Click on the Tabs to open or close the tabs. As you can see, all the Tabs are closed except the Navigate Tab.
Right Panel - The right panel has Histogram, Quick Develop, Keywording, Metadata etc tabs and I do not use any of these tabs. However, will talk about some of these tabs when importing images.
Library Filter - The middle area is library filter where images are filtered and organized.
Toolbar - Right below Library Filter is a toolbar. It has controls required to navigate, sort, rate and flag the images. In the library module screen shot above, Library Filter is in Grid View and images are displayed as a grid. In Loupe View only one image is displayed and in Compare View, as the name suggests, images can be compared side by side. Play around with the views to understand how the compare view works. More controls can be added from the popup menu.
Once the images are selected, pick Develop or any other module to perform the specific task.
Develop Module - as name suggests, this is where the images are developed or edited. Quick edits can be done using Quick Develop features in Library Module but have not used it yet. I usually do all my edits in Develop module. Click the screen shot for large view.
Left Panel - In the left panel, the tabs I work with or check are Navigator and History. Navigator displays the selected image. Above the image, there are options such as Fit, Full, etc to select how the we want the image to be display in workspace. Some of the options are for zooming. By default it is in "Fit" display and I always leave it on "Fit" unless I want to zoom in when editing.
History Tab - records all the edits and the history of the image. The only history for the selected image in the above screen shot is import, which was on 7/20. History panel keeps track of all the adjustments made on the selected image and the beauty of it is, at any point, adjustments and edits made to the image can be rolled back. If there were 10 (edits/adjustments) versions in the History list, at any point, may be even a year later, if ones wants to roll back the last 8 edits, just click on the last 2nd listing. Here is a History of another image.
It was imported (bottom most listing) on 7/20 12:24:27 AM, it was edited with bunch of settings and last exported on 7/20 7:05:58 PM. To illustrate how History list can be used to roll back, I added some Vibrance and Saturation. When taking the screen shot, I noticed I did not adjust Vibrance and Saturation settings on this image. I did that and then took the screen shot. After these two adjustments, I don't like the way the photo looks with the adjustments I made today. There are three ways to undo.
- Go to Edit Menu -> Undo. Here, since we made two adjustments, Vibrance and Saturation, we would need to click undo twice or Command + z twice.
- Go to the respective tool and adjust the settings manually.
- Easiest way is to click on the last Export listing in the History panel. Here, it is the third listing from top. LR will undo the last two adjustments and render the image with the adjustments made until the last Export.
Work space - I am not sure what the middle panel/area is called. I call it the workspace as most of the editing is done viewing this panel.
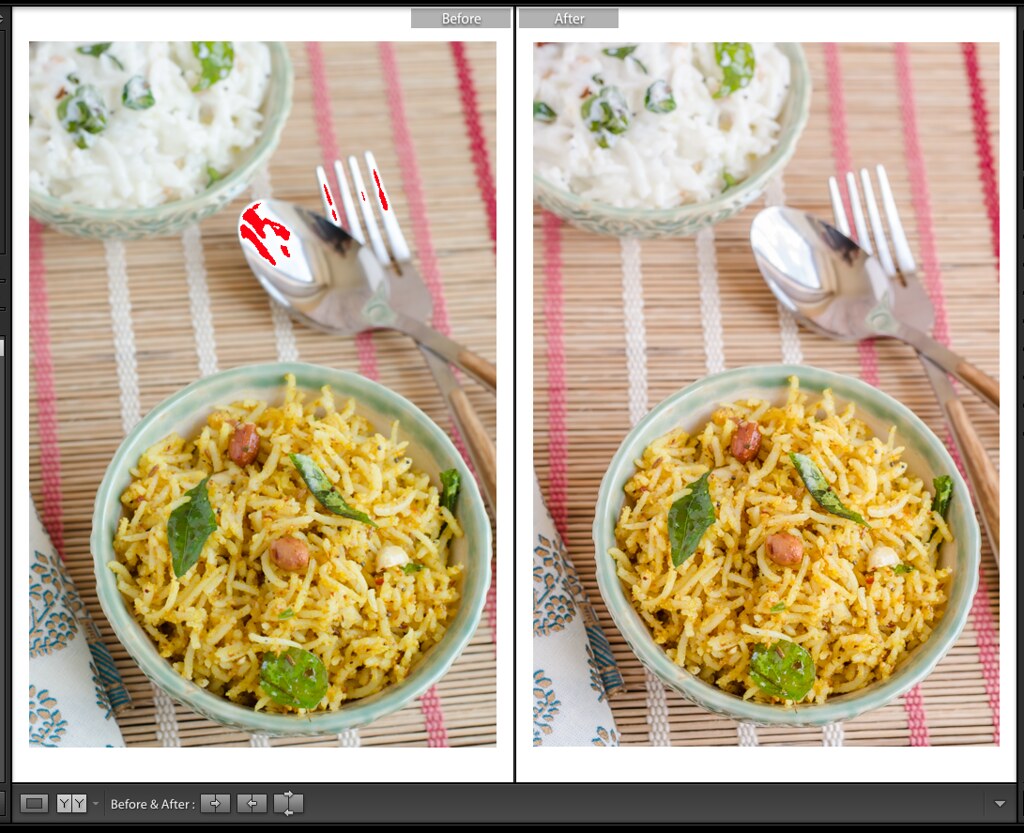
Tool Bar - This is right below the workspace. Toolbar in Develop module has Loupe view, Before and After View, and few more controls. Loupe View displays the selected image and Before and After View displays the image before and after editing. I usually use Before/After Left/Right option and this option can be changed by clicking the arrow button next to Before & After icon (YY). Click the screen shot for a large view.
By clicking the inverted triangle on right most corner of the toolbar, controls can be added or removed from the toolbar.
Right Panel - This panel has all the tools required to edit the pictures. This is the most used panel in Develop module. There are 9 tabs/sub panels and a Tool Strip. Of all these tool, I use Histogram, Basic, Details, Lens Correction and Camera Calibration tools the most. For food pictures I don't use Camera Calibration that much. I occasionally use the tools in Tool Strip and Effects. I shall talk more about these tools in part 2 of this tutorial when I share how I develop my RAW files.
Reset - On the Right panel, below Camera Calibration is a "Reset" button. Clicking on this button will reset all the changes made to the image. All the tools will be reset to zero or default settings and an original camera image will be rendered.
Library and Develop Module are the two modules I use the most. I shall talk about Print Module in another tutorial.
Importing Files
Well, I talked about organizing and selecting files in Library Module and processing the files in Develop Module. But how do we load or get files to Lightroom?
Before importing files to LR, we first need to talk about where to store the files. I have not really understood how LR stores files and the concept of Catalogs. All I know is LR works on Catalogs. And I am sure I am not organizing my files properly. Also, from some of the tutorials I read online, almost all of them have suggest or use external Hard Drive to store LR files. As of now I have my LR catalogs on my Hard Drive and also store all my RAW files on my Hard Drive.
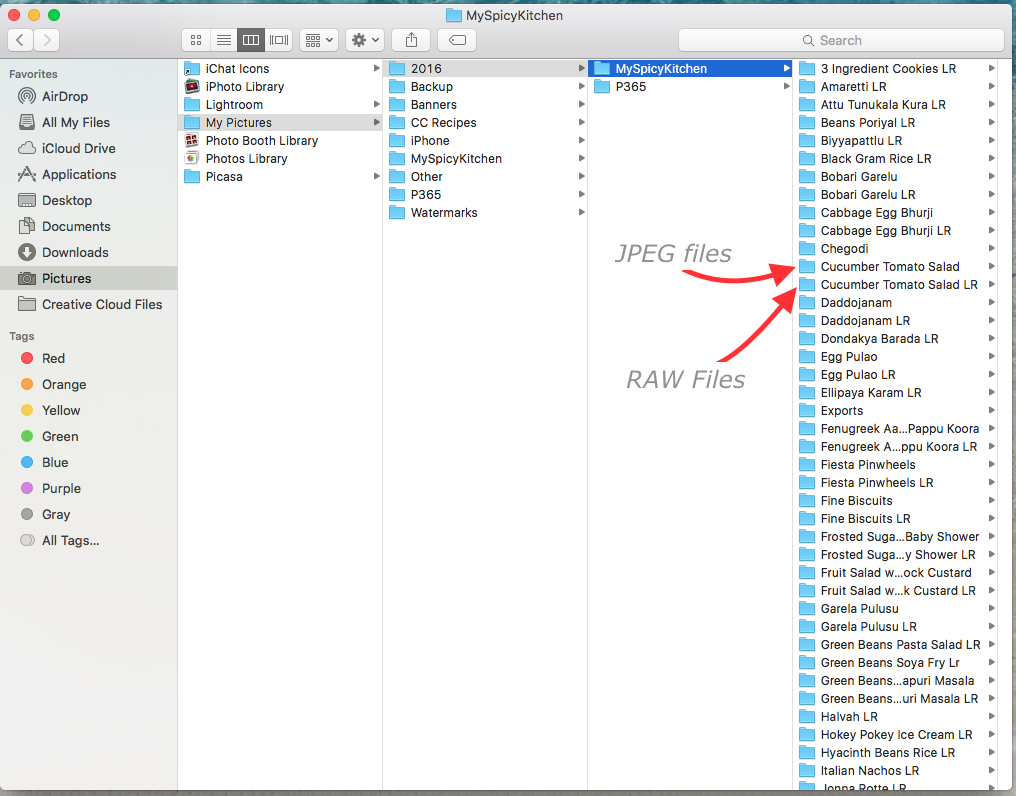
This is how my Folders look like. There two more levels of sub folders in my Picture Folders hierarchy, which I shall come back when we get to Exporting files. I have a folder per recipe and since I started shooting in both RAW+JPEG, I have two folders for each recipe. All the JPEG files of cucumber tomato salad goes into folder Cucumber Tomato Salad and RAW files into Folder Cucumber Tomato Salad LR. Once I edit my pictures, I delete the files with JPEG files. This is how I store but you can store the way that best works for you. I import my files directly from camera to my hard drive using USB cable and then import those files to LR..
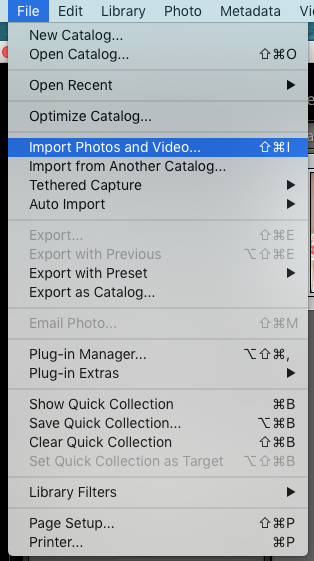
Now that we sorted out how the files are stored, lets get to importing files. There are two ways of doing it. One is going to Files -> Import Photos and Videos. I usually use this method. With this, I don't have to go to Library module to import the files. I can select this command irrespective of the module I am in. LR will automatically take me to Library Module to import the files.
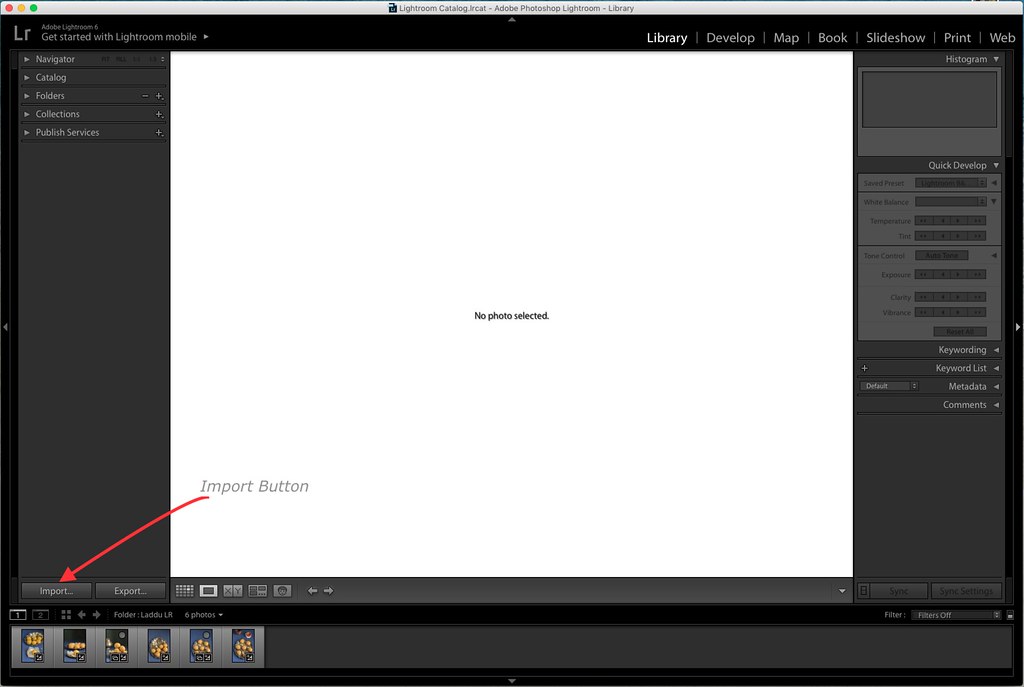
The second method is by clicking the Import button in Library Module on the bottom left corner of the left panel, just above the film strip. As you can see in the below screen shot, Library Filter is empty with "No photo selected". Click the screen shot for larger view.
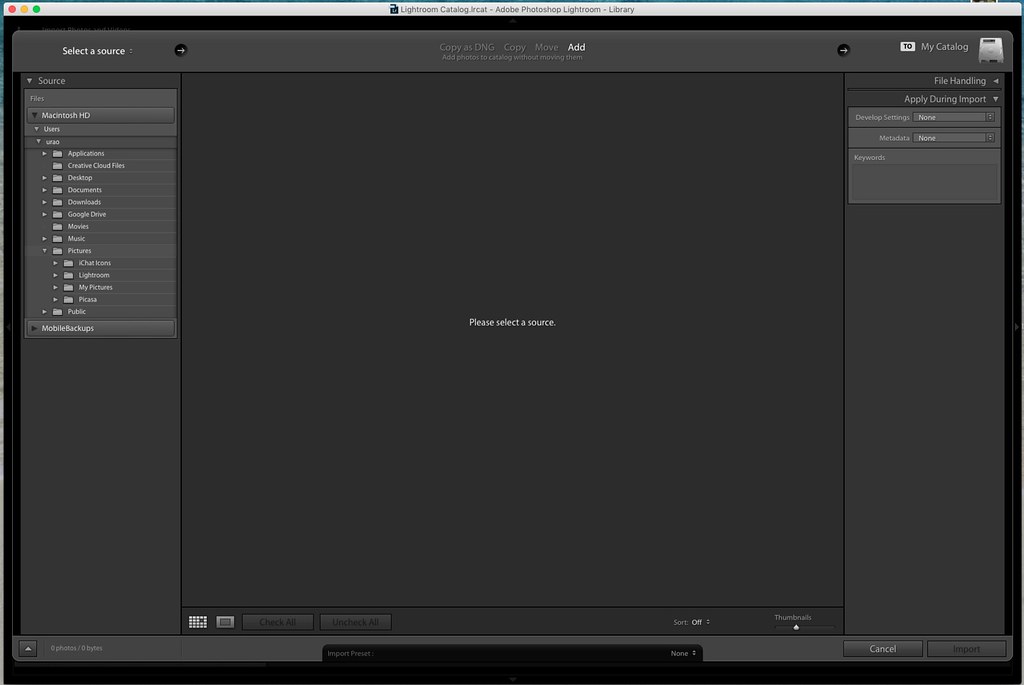
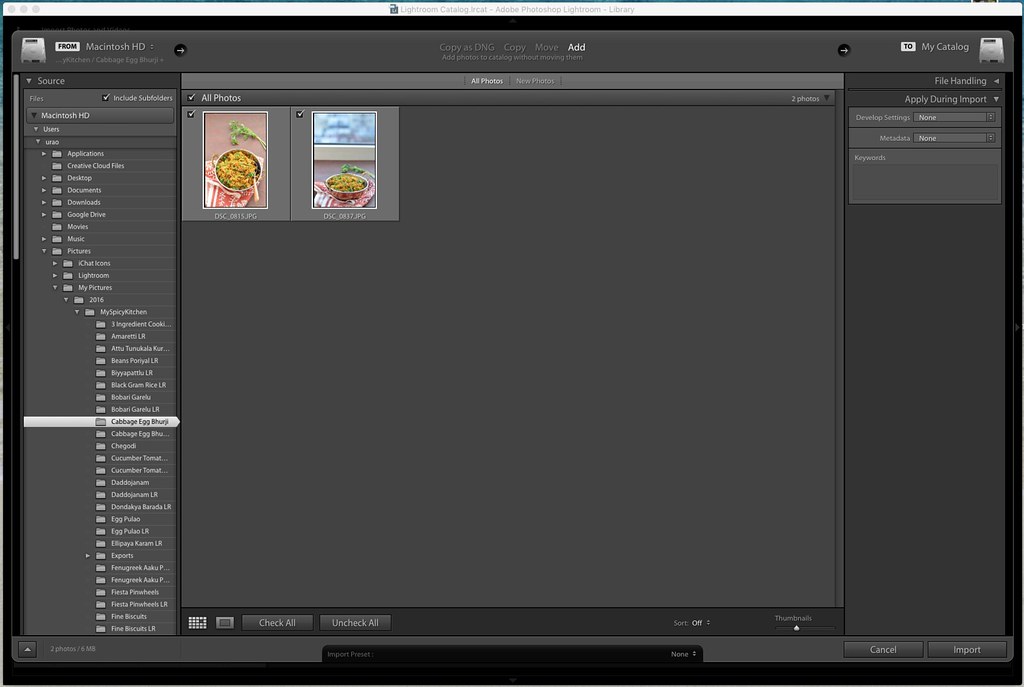
Once the Import button is clicked in Library module or "Import Photos and Videos" from File Menu, you will be asked to select the source from the top left corner of the application layout. My source is my Hard drive and you can see my source hierarchy in the below screen shot.
Once the folder is selected, all the photos in the folder will be displayed in Library Filter. Select the photos to be imported by checking the check box next to the photo. By default all the photos are selected. If some photos are bad and not worth editing, uncheck those photos. In my early days I use to navigate through the photos and pick the best photos. Nowadays I just import all the photos and delete bad photos after editing the best ones. Once the photos are selected, add some metadata or keywords to the photos in the "Apply During Import" panel in the right panel. I don't add any of these but adding keywords is a good idea. Then click the "Import" button on the bottom right of the screen.
Now the photos are imported and ready to edit in LR. Quick edits can be done in Library Module but I usually edit in Develop Module. I shall do that in the next tutorial.
Delete Files in LR
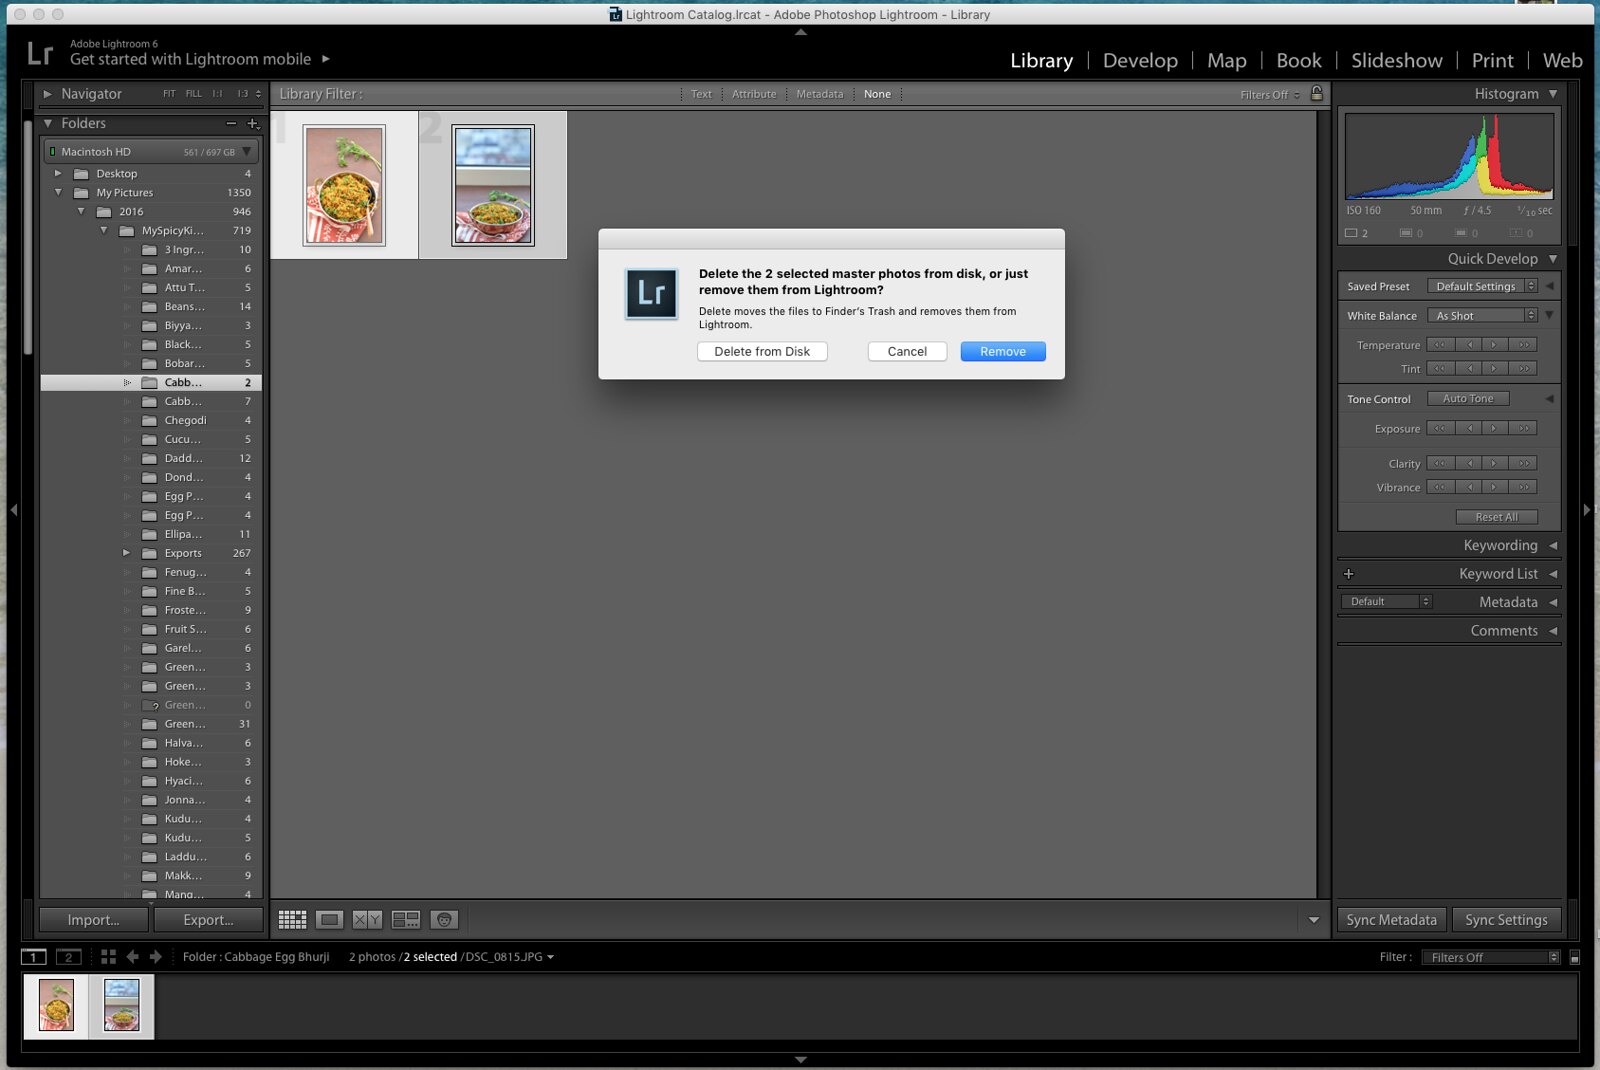
We have imported some photos but want to delete some of the photos. The way I do it is the old fashioned way. I go to Library Module -> Grid View (in the toolbar) -> Select the photos to delete. If multiple photos are being selected, use Command + Click for each photo. Once the photos are selected, press "delete" on the key board. You will be asked if you want to remove it from the disk or just from LR. Select the appropriate button to delete the files. Photos can be deleted from Develop Module as well, but will have to delete one photo at a time, though multiple photos are selected.
Delete Folders
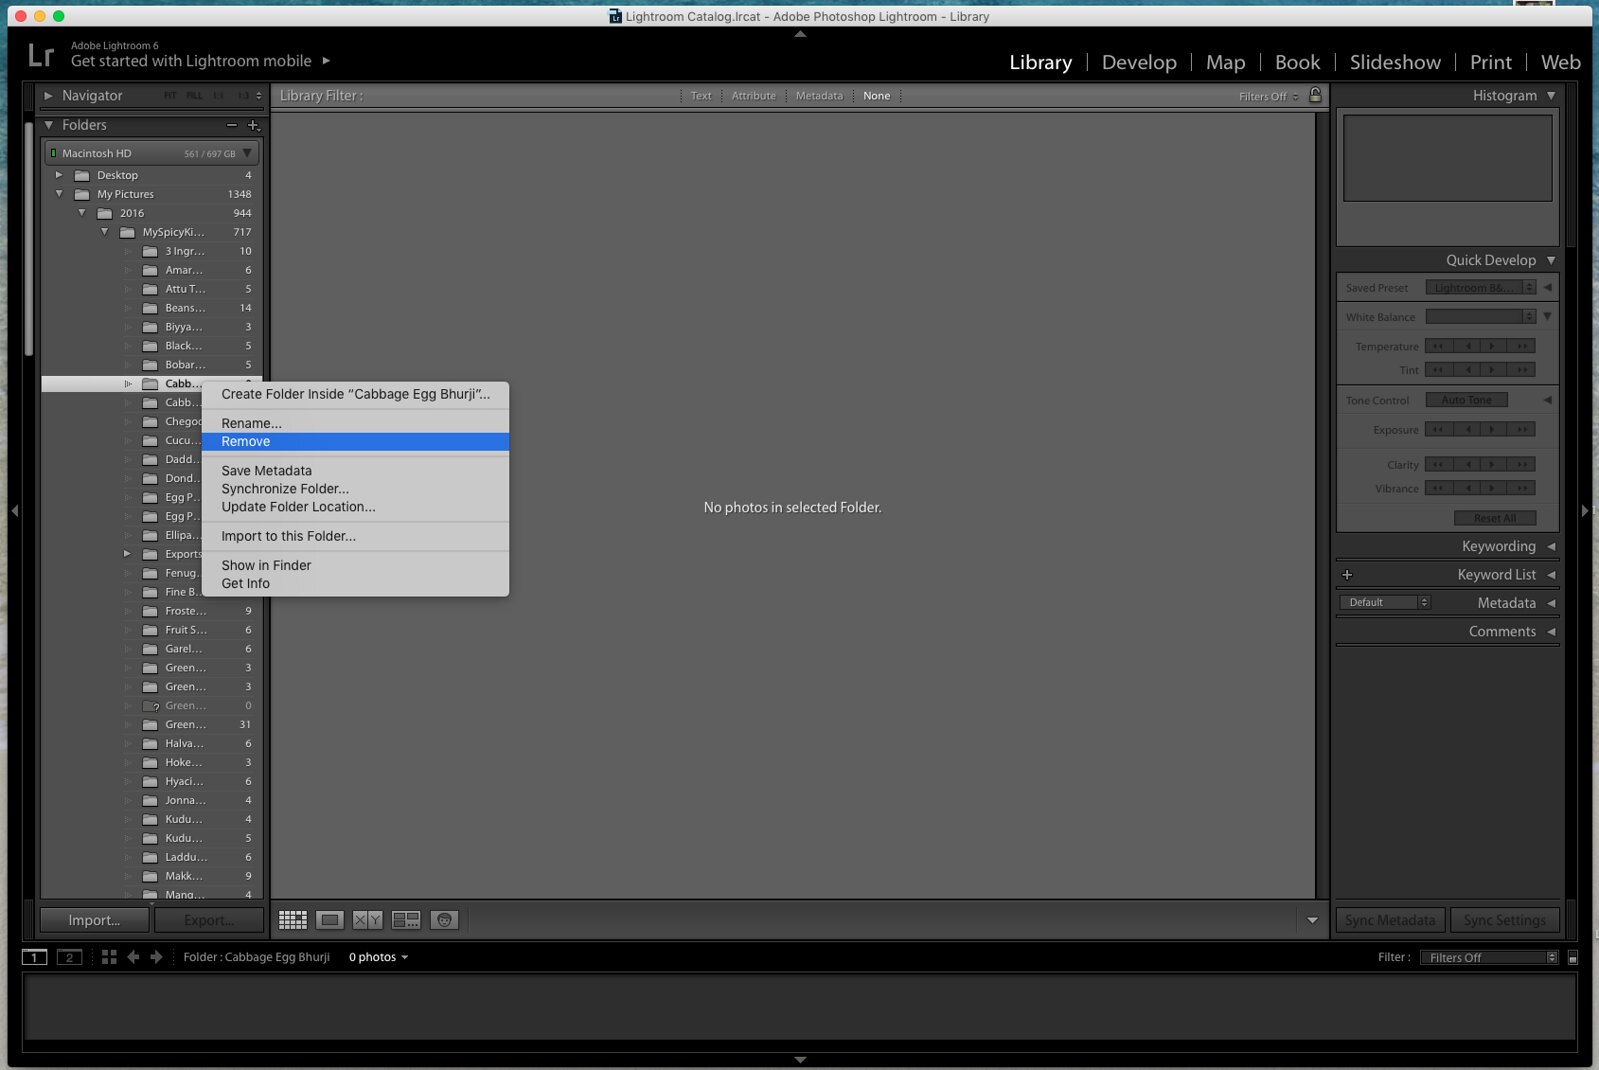
If all the photos in a folder are deleted, there is going to be an empty folder in Lr Catalog. That empty folder can be deleted by holding the cursor on the folder and pressing control+click -> remove.
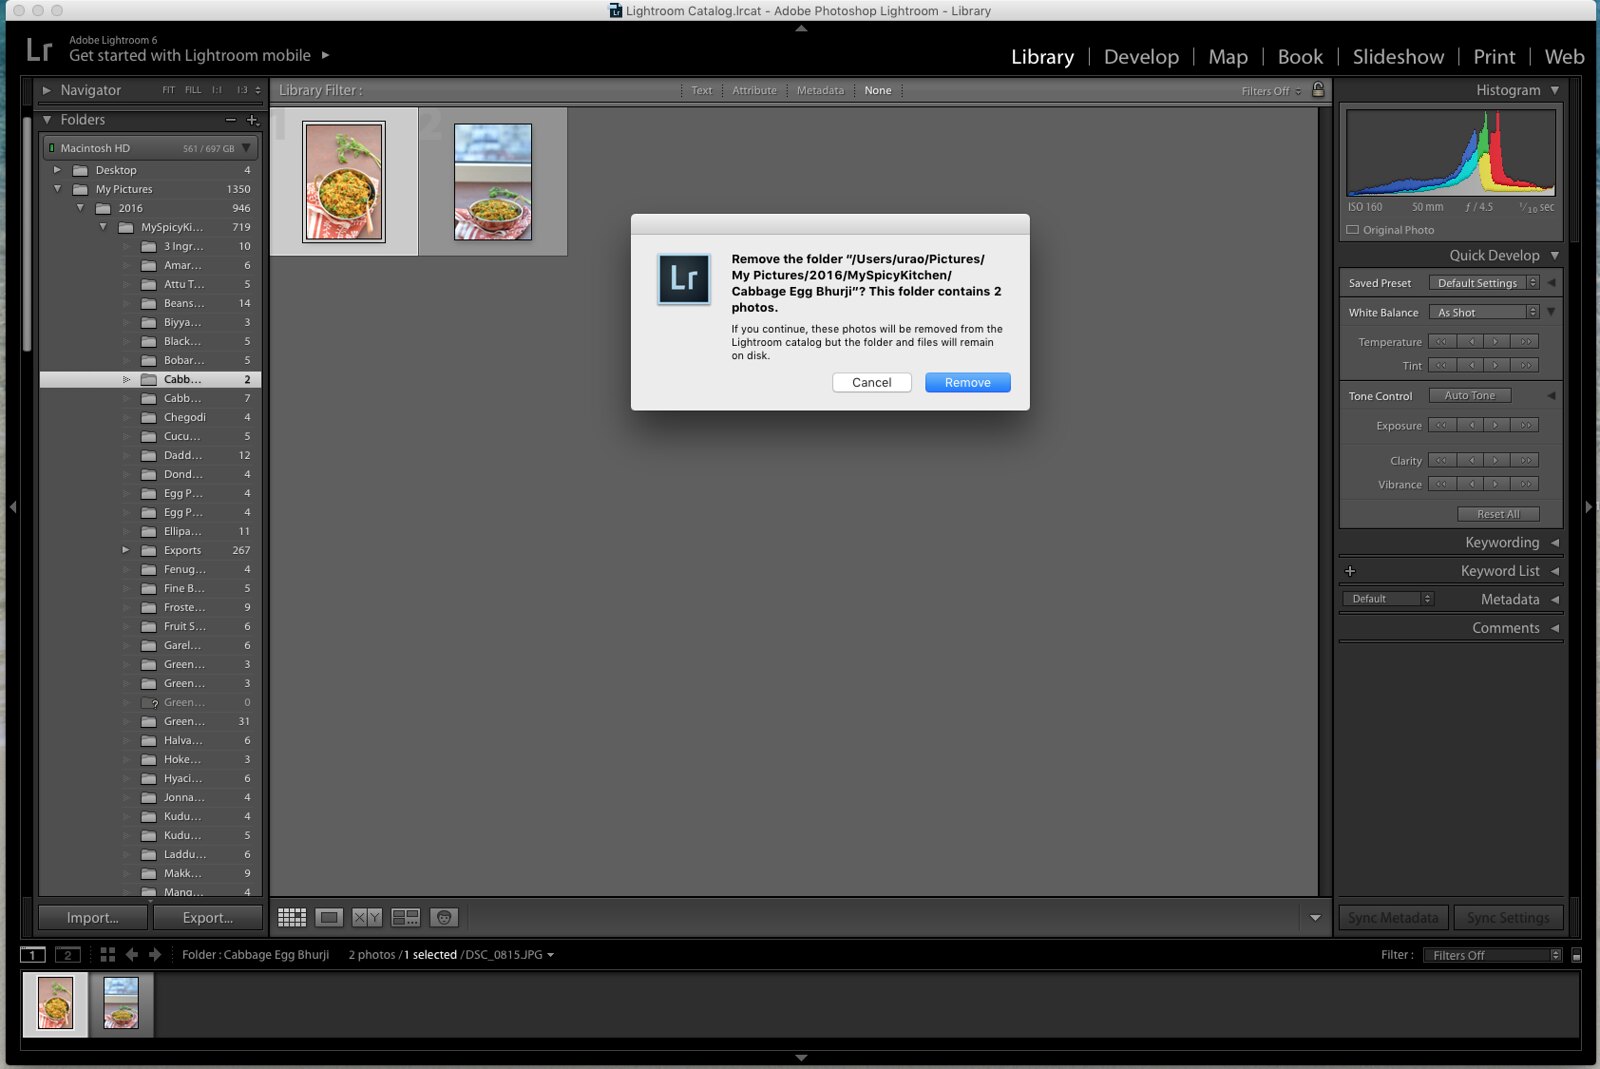
To delete a folder with photos, repeat the same command. Control + click -> remove. A pop up screen will ask if you want to remove the folder? Photos and the folder will be removed from the LR catalog but still remain on the hard drive.
My Work flow is usually this - Import files -> Develop -> Export and delete unused or bad files from the LR. Today we covered Import and Deleting files. In the next part, it is developing photos from RAW files.
I hope I didn't put you all to sleep. I was very confused on how to do this tutorial. I kept changing my mind. After drafting this post, I feel I should have done each module a day since I work only in Library, Develop and Print module. Well, I am very exhausted to redo the tutorial again and I am already a day late posting this.
This day in 2008: Spicy Egg Mushrooms






Pavani says
Very very useful post on LR Usha. I haven't had a chance to work with it yet but now I know where to come when I do start using it.
Priya Suresh says
Omg, this page is gonna be useful for many of us. Love the efforts you have put in to write this incredible post. Thank u Usha.
Smruti | Herbivore Cucina says
Such a great tutorial. This is definitely going to help me better the editing in Lightroom!