
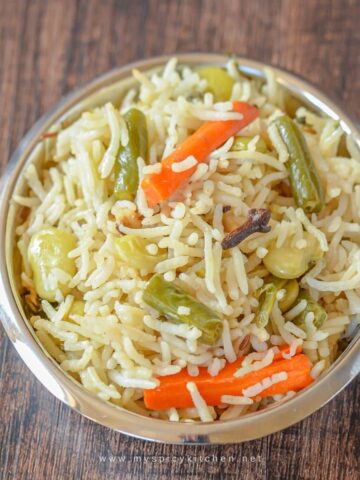
Biryani is one of my favorite one pot meals. I usually make non-veg biryani and when it comes to vegetable biryani, it is always Vegetable Pulao or Vegetable Bagara. For some reason, I am obsessed with kaccha (raw) biryani, where the meats & rice are cooked together in layers. I wanted to replicate the same procedure for vegetables. Recently, I tried cooking kaccha vegetable biryani and it turned out pretty good. I cooked the biryani by arranging raw vegetables and partly cooked rice in layers.
Don't be intimidated by the long list of ingredients and the lengthy preparation. It is not as difficult as it appears to be. A well cooked biryani is when the meat or the vegetables are tender and the rice is completely cooked. The key here is boiling of the rice. Rice should not be over cooked or under cooked. This is one step when extra attention is required during the preparation and how long the rice is boiled determines the texture of the biryani.

Total Time: 1 hr 15 minutes
Preparation Time: 30 minutes
Cooking Time: 30 - 35 minutes
Serves: 2
Note: Measuring cup used here is the one that comes with the rice cooker, which is 160ml
- ½ cup Oil
- 1 Small Onion Sliced
- ¼ teaspoon Saffron (few strands)
- ½ cup Milk
- Marinade
- 1 large Potato diced into 16 pieces
- 15 strings of Green Beans cut into 1 ½” pieces
- 1 large Carrot pealed and cut into 1 ½” strips
- ¼ cup Green Peas
- 6-8 Green Chilies slit vertically
- 1 small Tomato Pureed or ¼ – ⅓ cup Tomato Puree
- ½ cup Cilantro chopped
- ¼ cup chopped Mint
- 2 teaspoon Ginger Garlic Paste
- 1 teaspoon Coriander Powder
- Pinch of Turmeric
- Salt to taste
- 3 tablespoon or ¼ cup Yogurt
- Garam Masala OR ½ teaspoon store bought garam masala
- 4 Cardamoms
- 4 Cloves
- 4 Black Pepper Corns
- ¼ teaspoon Caraway Seeds or Saha Jeera
- ¼” Cinnamon
- Cooking Rice
- 2 cups Rice
- 4 Cloves
- 4 Cardamoms
- ½ teaspoon Saha Jeera
- 2-3 Bay Leaves
- 1 Biryani Flower
- ½ teaspoon Ginger Garlic Paste
- 1-2 tablespoon salt
- Wash Rice and soak it for ½ hour.
- Meantime, cut the vegetables. Prepare garam masala powder by grinding together all the ingredients listed under Garam Masala. Grind tomato to a paste. It doesn't have to be fine paste. Mix all the ingredients together listed under marinade.
- In a 2 quart pot, bring water to a boil.
- Meantime, continue with the preparation. Heat oil in a pan and fry the onions until golden brown.
- Once water boils, add all the ingredients listed under cooking rice, except rice. Give it a good stir. Drain the rice from water and add it to boiling water. Give it a good stir.
- Let it boil until rice starts rolling over. One good boil is enough. This should take about 3 minutes.
- Drain the rice and keep aside ½ a cup of boiled water aside of later use.
- Arrange vegetables and rice in layers. In a 2 qt pot, add some oil and arrange the marinated vegetables at the bottom of the pot. Use the same oil that was used to fry the onions.

- Layer half of the cooked rice on top of the vegetables and sprinkle ½ of the remaining oil and ½ of the saffron milk.

- Layer the remaining rice and sprinkle remaining oil, milk and ½ cup of boiled water.

- Cover the pot with 2 sheets of aluminum foil and cover it with the lid. Carefully fold the foil and seal it around the lid so that steam doesn't escape when cooking the rice. Also, put a heavy pan or a motor pesto or a heavy object on top of the lid to stop the steam from escaping.
- Cook for 8-10 minutes on high until steam escapes from the foil seal. Reduce the heat to low and cook for another 25 minutes.
- Open the pot after 10 minutes and mix it well so that the vegetables and rice are properly mixed.
- Serve hot with raita or any gravy of your choice.
- The cooking times are based on my gas cooking range. When preparing the recipe for the first time, don't go just by the cooking times I mentioned and use your discretion.
- If you feel vegetables or the rice is under cooked, cover and cook it on low flame for few more minutes and if required, sprinkle some water before cooking it.
If you like this recipe, you may also like these:
Hyderabad Chicken Biryani
Hyderabad Mutton Biryani
Shrimp Biryani
Egg Dum Biryani


Vani says
This is a very great recipe! Tried on multiple occasions and it never failed me.. I was going make it 2 times more than usual (4 cups rice).. will this change my cooking time? Please help..thank you!
MySpicyKitchen says
Vani, you will have to cook it a little longer. Cook it for 12 - 13 minutes on high until steam escapes, reduce the flame to low and cook it for 30 minutes. I haven't cooked veg dum biryani more than 2 cups but usually cook chicken biryani with 4 cups of rice and cooking time I mentioned works. Since it is chicken, I cook for 12-13 minutes on high. Vegetables cook much fast, so keep an eye on it from 10 minutes into cooking and once the steam escapes, reduce the heat to low.
I hope this helps.
varsha says
excellent it is soo tasty.but if u have made a dhum in it thats all fantastic.
khushboo says
2 qt pot means .. is it a matka ...
do the layers as you have mentioned & thn cover it with some still plate & thn foil paper or dough to cover it from edge.
am i right ?
i will try this very soon
thanks for the recipe . awaited for the reply.
MySpicyKitchen says
Khushboo, when a say pot, I don't mean a matka. Any 2 qt / liter vessel with a lid. You can use a steel plate to cover it and use the foil. If you wish you can also use dough to cover the edges, instead of foil. Traditionally dough is used to seal the edges but in the US, we usually use a foil instead. Do try it and let me.
Vasavi says
Tried it today and loved it. great recipe. my hubby said thanks to you and i was till today apprehensive to try dum biryani but thanks to you will try again.
MySpicyKitchen says
Glad to know you loved it.
sruthi says
Thanks for the recipe. Did you try making this in the oven? If yes, at what temperature?
MySpicyKitchen says
Sruthi, I did not try this one in the oven. Sorry.. Will update the blog when I make it in the oven. Thanks for stopping by and happy cooking!
charulatha says
thank you so much for the recipe.
Sudheer says
Thank you very much for the recipe, it came out really tasty and authentic....
sarah says
Thanks so much for this recipe - worked really well and was delicious plus now it's winter here it makes perfect comfort food. I'm off to drool over your other recipes now...
Madhuram says
This biriyani looks perfect Usha. I want to try it ASAP.
Malar Gandhi says
I love biriyani, count me in:)
meeso says
This is a great entry, looks so delicious!
Sushma Mallya says
beautiful click and delicious biryani...
sayantani says
great looking dum biriyani. one of my favourites and perfect for JFI: Saffron
sunitha says
Wonderful.. you have got the rice perfect... and I agree that is the key.
Divya Vikram says
I like your step by step instructions. Will try this recipe sometime.
Since I was sending it to DK's event, thought I would post it in her style, step by step instructions... 🙂
notyet100 says
ummm ,..;-)
Gulmohar says
That looks awesome with the beautiful and perfect rice grains...must be delicious too 🙂