
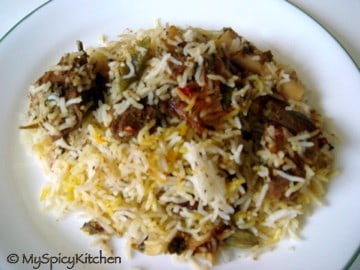
As I mentioned in my earlier posts, Biryani can be cooked in two ways. One is the raw meat method in which the rice and the meat is cooked together in layers, and the other is cooked meat method in which pre-cooked meat and rice are cooked together in layers. I follow the raw meat method for Chicken Biryani and Shrimp Biryani, and pre-cooked method for mutton biryani. Here is the recipe for mutton biryani...
Total Time: 1 hours
Preparation Time: 30 minutes (excludes marination time)
Baking Time: 30 minutes
Serves: 4-5
Ingredients:
Marinade
- 2 lbs Goat meat cut into pieces
- ¾ - 1 cup yogurt
- 2 tablespoon Ginger Garlic Paste
- 2 teaspoon Chili Powder
- 14 small Chilies split into two (adjust to your taste)
- 1 cup chopped Mint Leaves
- 1 cup chopped Cilantro
- Salt to Taste (sufficient for the meat)
- Garam Masala Powder
-
Garam Masala
- 10 Pepper Corns
- 10 Coves
- ½ teaspoon Cardamom Seeds
- ½ teaspoon Sahajeera or Black Cumin
- 1” Cinnamon Stick
Rest of the Ingredients
- 1 Large Onion sliced
- 1 Lime
- 1 cup Oil (can use half oil and half ghee)
- ½ teaspoon of saffron strands
- ½ cup milk
- 4 cups Basmati Rice soaked for 30 minutes (rice cooker measuring cup)
- Spices for boiling rice
Spices for boiling rice
- 6 Cardamoms
- 3 Cloves
- 2 Bay Leaves
- 1 Bay Flower or Biryani Flower
- 1 teaspoon Sahajeera
- ½ teaspoon Ginger Garlic Paste
- 1 tablespoon of Oil
- First Full of Salt
Method:
- Clean and cut the goat meat.
- Grind all the ingredients listed under garam masala to a fine powder.
- Mix all the ingredients of the marinade and marinate for at least 2 hour , preferably overnight in the fridge.
- Cook the meat with ½ the oil in a pressure cooker. Don't add any water when cooking. In my cooker it takes 6-7 whistles and 5 minutes on low flame to cook. Let it cool. Once the pressure in the cooker goes away, open it and cook it until all the water evaporates. OR
- Can cook the meat on the stove top until tender. This will take about an hour. I prefer the pressure cooker to avoid the cooking odor by cooking on stove top.
- Squeeze the lime juice on the meat and mix well.
- In a pan, heat oil and fry the onions until light golden brown.
- Soak saffron in hot milk.
- In a big pot bring water to a boil, add all the spices required for boiling rice and mix well.
- Add rice and continue to cook until the rice is almost done. It takes about 7-8 minutes on my stove. Drain the rice and keep aside.
- Preheat the oven to 400 degrees F.
- Now its time to arrange rice and meat in layers. Grease large baking tray with oil, layer half the rice at the bottom. Sprinkle some oil, fried onions and ½ the saffron milk. Layer the rice with meat followed by a layer of remaining rice. We should have 2 layers of rice and one layer of meat. Top it off the remaining oil, fried onions and saffron milk. Cover the tray with aluminum foil.
- Bake the biryani for 10 minutes on 400 degrees F and then for 20 minutes on 350 degrees F. The total bake time is 30 minutes, 10 minutes on 400F and 20 minutes on 350 F.
- Mix the rice and serve it hot with raita or chicken shorva /mutton shorva
This is my entry for RCI: Authentic Hyderabadi Cuisine hosted by Mona.
I am also sending it to Rice Mela.


Wajiha Alikhan says
Hi! Thank you for the recipe, I'm excited to try it this weekend! About how many adults would this feed? Trying to gauge if I need to increase the quantity. Thank you!
Usha Rao says
This will easily serve 4-5 people. If you wish, you can increase the meat quantity, depending on what else you have on the menu.
Pavani says
Hi,
I am planning to cook Mutton Biryani fir the first time in the Oven. Came across your recipe and all the wonderful comments about it. I need your help with the some questions. If i take 4lbs goat meat and 4 cups rice. Does the cooking time change? I do not have a pressure cooker, i use an instant pot. Plz suggest how to cook goat in instant pot. Should i place the biryani to cook in the first or second tray of the oven.
Thanks
Usha Rao says
Sorry, for late reply. Just seeing the comment. No. Cooking time does not change. But make sure use you do not use a very deep tray for baking. Use a shallow tray or sauteuse pan. When cooking meat in Instant Pot, sprinkle some water. Do not add too much, meat will release lot of juices, add a just little water to avoid the burn error from IP. Cooking time varies on how tender the meat is. I usually do 5 minutes manual (pressure cook) setting and release pressure naturally. Meat will release lots of juices, so once you open the lid, switch to saute mode and cook until most of the juices evaporate. Rest of the preparation is the same.
If you have a wide saucepan, you can even cook biryani on stovetop instead of the oven. In which case, arrange the meat and rice in layers as mentioned in the recipe. Cover the pan, seal the lid with aluminum foil, put a heavy cast iron pan or weights to seal the steam (for dum) and cook on high flame for 4 minutes and 12 minutes on low flame. Let it rest for 15-20 minutes at least, before opening the pan.
Namit Kumar says
Hello Usha,
You just have nailed biryani recepie. Each time we serve it to the Guest it becomes topic of discussion for weeks . Keep it up!!!.
MySpicyKitchen says
Thanks you!
Lakshmi Sandeep says
Hi Usha,
I tried this recipe and no doubt it turned out to be super delicious. Now it's one of the favourite recipe of my husband! Have been doing it very often 🙂 Thank you so much!
lakraj80 says
Thanks vey much for the recipe! I followed it to the t and results are amazing!! Thanks for sharing!
Michelle says
Hi. Can we follow this same recipe only with lamb? Do we still cook the lamb with oil in the pressure cooker?
MySpicyKitchen says
Yes you can use lamb. I still need to pressure cook the lamb. If you do not have a pressure cooker, cook the lamb in a pot until it is tender and then follow instructions as given.
Happy cooking!
sonu says
Hey just wanted to ask do you not fry the mutton in oil ?I see you saying to just boil with oil.
Please correct me if wrong.
MySpicyKitchen says
Sonu, need not fry mutton in oil. Cook the marinated mutton with oil. If using a pressure cook, plenty of juices of will be released from mutton. You need to open the cooker and cook until most of the juices/liquid evaporates. When doing this, mutton will also be roasted. Hope this helps.
Pallavi says
Being a vegetarian cooking meat was always difficult for me. I made this briyani and it became a super duper hit. Everyone wants me to cook this briyani often.. I am glad I found ur site. Thank you.
Lubna says
I juwt made this, its delicious! I finished it on the stove rather than oven.
MySpicyKitchen says
Lately even I am finishing it on the stove. I should update the post with cooking time on the stove stop.
Lubna Hussain says
Hi Usha,
This recipe looks delectable and after reading your followers reply, I am surely gonna try this tomorrow.
I have a question. You mention cardamoms in your recipes. Are these the black big ones or small green ones?
Thanks
MySpicyKitchen says
Small green ones, Lubna.
shahla says
Hi , I just wanted to know if not making own garam masala powder how much to use if using store bought? also would like to know how much cooking time is 6-7 whistles. I just got a pressure cooker and will be first time using it.
MySpicyKitchen says
You can use about 1 tsp store bought garam masala. Ho spicy garam masala varies from brand to brand to. The first time use it be a little cautious and adjust to your taste. 6-7 whistles about be about 7-10 minutes.
Thilo says
Hi, I would like to try this out but didn't understand the baking tray part. Should it be a deep tray? Or coos I use an oven pot and put the layers, I only have a flat tray of about an inch tall so I won't be able to put layers..
MySpicyKitchen says
It need not be very deep. You can use a pyrex tray or a disposable aluminium tray. You can also use an oven pot.
Raman says
Hi - I do not have an Indian pressure cooker. I know that time will vary but what does 7-8 whistles translate to in time (roughly). I have been making chicken dishes but am not comfortable with mutton, yet.
Regards.
Ruby says
I made this Hyderabadi Mutton Biriyani for Christmas lunch. Since I am not a good cook, I tried to follow the recipe as best as I could. It turned out pretty good. I would use less oil the next time but I loved the flavor. Thanks!!!
nima says
i made this biriyani today and it came out awesome!!! thank you for an awesome recipe:)me and hubby loved it a lot:)
Master chef says
Congrats Usha it's an amazing recipee!!!i would like to add that instead of adding all the spices you get a read made biryani masala these days available all over its called "SHAAN" it's simply amazing.Also would like to add that you can simply cook your rice completely instead of leaving it half boiled and then cooking it in dum.while hot remove it and add ghee and then saffron this makes the rice nice and grainy. The last step you start layering the rice and the cooked mutton.For garnishing add fried shallots can assure you it will be a 10/10 dis master chef class
nikita says
Hi,
I've made this dish several times now and it comes out great each time. Thank you soo much for the recipe with detailed instructions. My husband and I love hyderabadi mutton biryani - thanks again from the bottom of our hearts 🙂
Nikita
Suhaylah says
Do not add salt while marinating the meat in case of raw meat.. If you don't add salt meat will not give out water.
shahla says
can you specify exactly what kind of green chilies you used?
MySpicyKitchen says
Shahla, I used the small green chilies we get in the Indian store. I do not know where you live. If you are based in India, you can use the thin green chilies.
Nirmala says
Hi planning on using yr recipe this weekend but just want to clarify lliquid issue for pressure cooker. You add 1/2 cup oil along with all the marinade and no water is this correct? Look forward to yr urgent reply-thanks much!
MySpicyKitchen says
Nirmala, no need to add water. Meat will release plenty of juices when cooking. Sometimes I sprinkle a little water on the top but no more than that.
Fauzun Akhtar says
Thank you for sharing ur beautiful rescipe .Ur briyani rescipe is excellent
Fauzun Akhtar says
Luv dis website.want 2 learn more about cooking
Punam Gogoi says
hey ... thanks for the recipe...and for the comment by BM... i cooked it yesterday and my potential in-laws were damn impressed... <3
vivek says
ur right mum was very happy n surprised....it was awesome..thanks a lot..
i guess every sunday i would try out ur recipe:)
vivek says
hii..i m cooking for the first time...fr my mum, i m really excited after reading other comments..
i hav a few questions:
1)should i keep the marinade in fridge if i hav only 2 hours.
2)which is better option(i dont hav a oven and a big pot)
a. electric rice cooker
b. microwave
c. regular pressure cooker,
and how to layer rice n mutton in either of above option...
hoping fr a reply
MySpicyKitchen says
Hi Vivek,
1. if you have only 2 hours, you need not keep it in the fridge, provided it is not very hot outside/in the kitchen.
2. Electric rice cooker might not work as I tried it once and it did not work for me. I never tried cooking it in the microwave. I would say the best option would be the pressure cooker. Put all the mutton in the bottom layer, then two layers of rice. Sprinkle little oil, fried onions & saffron milk between the two layers of rice. Sprinkle the remaining fried onions, oil & saffron milk on the top layer. Cook it on high for 2-3 minutes or until you hear a sizzling sound from the cooker & steam begins to release steam. Reduce the heat to low and cook for another 10-12 minutes. Then turn of the heat and let it sit for 10-15 minutes before opening the cooker. Do not put the weight. Cook it without the weight/whistle on teh cooker. I have not cooked in the pressure cook and the times I mention are approximate guess. Good luck & happy cooking! No matter how it turns out, your mom is going to be very please.
Tan says
Hi. May I know ur mutton means adult lamb or goat meat?
MySpicyKitchen says
In this recipe I used baby goat meat but you can use adult lamb or goat meat.
Priya says
Hi, this is an excellent recipe.I made it thrice and it tastes better every time.this is the safest menu each time a guest visits us:)thanks
Krithica & Indrajit says
We followed the recipe to the dot, and the result was fabulous. In fact - one of THE BEST biryanis we have ever had. The mutton was marinated beautifully, and very soft indeed (Overnight). The first hit of the biryani was spicy which mellowed down subsequently, and was wonderful in that the grassy taste of mutton was hardly detectable.
Thanks a lot for the tip
Riyaz Abdul Dubai says
Excellenttt reciepe!!!! The whole family loved itt.. Not a grain of rice left in the pot.. Completely attacked and finished off on the dining table.. 10 out of 10 points
MySpicyKitchen says
Riyaz, thanks for trying out the recipe and for the feedback.
Tala says
Three cloves of what? Garlic in the rice?
MySpicyKitchen says
Tala, not garlic cloves. This clove is a spice.
Devleena says
Thanks for sharing the recipe. I tried it and came out very nice. I didn't have fresh mint, so ended up using dry mint..worked fine.
Tala says
I actually like dry mint a lot better. The flavour is more suttle.
Nishat says
HELLO..
I WANTED TO ASK DAT IS THERE ANY ALTERNATIVE OF BAKING IT ACTUALLY I M NT HAVING MICRO-WAVE....PLSS REPLY SOONNN......!!!
MySpicyKitchen says
Yes. You can cook it on stove top. Take a wide pot,arrange meat in the bottom layer followed by a layer of rice. Sprinkle half the oil, milk and fried onion on the rice. Arrange the remaining rice on top of it. Sprinkle remaining oil, saffron milk and fried onions.
cover the pot with two layers of aluminum foil, cover it with a lid and seal the pot properly with more aluminum foil. Put a heavy object on top of the lid and cook on high heat for 3-5 minutes until the pan and the rice inside gets warm. Reduce the heat to low and cook it for another 10-12 minutes. Let it sit for 10-15 minutes before opening the pot.
You can refer to chicken biryani recipe on how to arrange the rice in layer and sealing it. http://www.myspicykitchen.net/2008/07/17/chicken-biryani/
santhoshi says
hi,
i have tried your mutton dum biryani recipe.it really came out very well n my friends loved it a lot.thanks for the recipe.
MySpicyKitchen says
Santhoshi, thanks trying out my recipe and for letting me know
Nandini says
This recipe is terrific. I changed the marinade for the mutton by adding a lot more mint, chilli powder and reducing the green chillies. Thanks for posting such thorough instructions.
Ramya says
Hi Usha,
Really thanks for the great recipe. I am trying to make a perfect biryani from 2 years. Today is my day and it turned out perfect. Its just because of you and your clear process description. I got great appreciations from my guests. Thanks a lot Usha. Will try more recipes from your blog
Rafi Rahi says
Hiya, I am just following your recipe for a iftar party today where I have feed around 20 people. So everything you have mentioned here for the ingredients amount, I am just using triple of that and trying to follow your instruction as much as i i can except that I am cooking in normal cooker (gas). Lets see how it goes, I am quite excited!
MySpicyKitchen says
Good luck Rafi Rahi! and let me know how it turned out.
Lois says
Hi, I just made this and it turned out really well, flavourwise. But the meat was not cooked enough. I marinated it 5 hours. In my pressure cooker it took at least 10 minutes to make 7 whistles and then with the lid off it took 15 minutes to evaporate the water - but I cooked it on high (w/o lid)because I was in a hurry. Followed the baking instructions exactly. Any suggestions? Thanks a lot for the most Hyderabadi-like biryani i've made so far =)
MySpicyKitchen says
Lois, Looks like the meat was not cooked in 7 whistles. Try cooking it a little longer, perhaps for 8 whistles. I cook it for 7 whistles on high and then for another 3-5 minutes on low. Then I turn off the heat and let the cooker cool. Once the pressure is released, I open the cooker. Check if the meat is cooked. It should be almost cooked, 98% done. If not pressure cook it for one more whistle or cover and cook until the meat is tender. Then cook it with lid off, until the water evaporates. Even I cook it on high, without the lid, to evaporate the water. The meat should be well cooked or at least 99% done before going into the oven.
I guess you have to figure out the number of whistles required to cook the meat on a trial and error. I hope this helps.
shamil says
hi
why dont you use turmeric in this recipe ?
MySpicyKitchen says
I like the color of the rice without turmeric. Addition of turmeric makes biryani little yellowish in color. It is just a personal preference.. You can always add a little turmeric, if you like.
Suresh says
A quick question please...the 2lbs goat...is it boneless or with bones please? This is my first attempt at biryani!
MySpicyKitchen says
Suresh, I used boned goat meat. Happy cooking and enjoy the biryani!
Indu says
This recipe was a smash hit. I have never made Biryani before, infact I am not very confident when it comes to complicated dishes. But the instructions were crystal clear and easy to follow. Thank you so much. There were some very satisfied people at home.
This recipe goes into my recipe book and I am definitely making it again.
Shareen says
I am cooking the beriyani at this very moment, had to just comment the aroma in the kitchen and the whole apartment. Im in heaven!! 🙂
MySpicyKitchen says
Are you? Hope you enjoyed it and let me know how it turned out.
Farah says
your recipe sounds really yum, mashallah... please lemme know how to prepare the baking in a microwave oven instead of an electric one. in my microwave oven, i have no option to set the degrees, it directly requires time... it's so much automatic & a good one 🙂
usha says
Farah, I have never tried it in the microwave oven. You got to do this by trial and error. I would suggest microwaving it for 10 - 12 minutes, open and check if it is done. If not microwave it for another 2 minutes. Keep doing this until it is cooked, checking it in an interval of 2-3 minutes. The first time you cook it in the microwave, you have to check it in between to see if the rice is cooked. Please do let me know how long the cooking time is in the microwave, as I have never tried this method before.
You can also cook it on the stove top. Cook it on high for 6-8 minutes until the steam begins to escape from the cover and the foil. Then reduce it to medium low and cook for another 12 minutes.
Hope this helps. Don't hesitate to ask me if you have more questions about this preparation.
laila says
Hi, the biryani was fabulous. Thank you for the recipe. I made a slight change, I added coriander seeds to the garam masala. I also added kewra as I read that someone else had, and it was just finger licking! I'm going to dig around for more recipes from you now! Thank you!
usha says
Good to know it came out well.
BM says
I chanced upon this recipe, few days back. I am a professional chef and can authenticate this recipe as something which is truly authentic. Few pointers though. a) Quality of meat : Marination and subsequent cooking time is totally dependant on this. For really good biryani I use a mix of goat meat taking pieces from front leg, back leg (40-40 combination) and remaining from shoulder area. b) I've found instead of using plain water to boil rice, chicken broth is even better. However, I do NOT cook the rice, I heat the water to boil, add the spices and rice and switch off the heat. Leave the rice to soak overnight along with meat marination. Morning, the water's discarded and the rice is spead in a big platter to dry and which is then used for the biryani. Why? I found it safer, as different varieties of rice have vastly different cook times. d) I do not use aluminium foil. I make a dough which is place around the utensil's cover thereby sealing the flavor. e) The spices used in rice are not placed randomly but are within a small metallic container (having holes) except the bay leaves. These spices + bay leaves are again re-used when making the biryani. f) As a twist, I have tried adding saffron 50-50. I added the 1st. 50% as per the recipe above and the remaining just 5 min. prior to serving. Effect on customers are better!
sri says
Hi Usha-
Is the total bake time 30 min? 10 min at 400F and 20 Min if at 350F. Or its 10 min at 400F or 20 min at 350F. I am not sure if I understood you there. Can you please clarify?
usha says
Sri, total bake time is 30 minutes. 10 minutes on 400F and reduce the temperature to 350F and bake for another 20 minutes.
I think I should make it more clear in the preparation. Will do so right away.
sri says
Usha-
That was a quick response, apreciate it. Thanks for taking time to clarify it. I am cooking right now and will let you know how it comes out.
sri says
The Best Biryani I have ever made period.
Thanks Usha.
Sehyr says
OMG!!! I've always been skeptical of making biryani, and I must say yours really very easy to follow. I was delighted when it came out so well. Thank you Usha.
Asha says
Can i use cooker instead of oven
usha says
I have not used the cooker but you can cook it on the stove top, if you have a big pot that can hold the meat and the rice. Arrange the meat at the bottom of the pot and add rice in two layers. Cover the pot with aluminium foil and then cover the pot with the lid. Seal it with foil so that the steam does not escape. Basically, the you need to cover the pot so that the steam does not escape. Cook on high for 5 minutes or until the steam escapes. Reduce it to low and cook for 10-15 minutes. Turn off the heat and let it sit for 10 minutes. Mix well and serve. If the rice is not cooked, cover and cook on low heat for few more minutes. Hope this helps.
manjjs says
Hi Usha,
I tried ur recipe and yes it came out perfectly well.. thanks for the great recipe.. keep coming...
Manjjs
Jayani says
hiii….dear.. i tried many times to prepare hyd mutton biryani from many website it never turned in a better way, yours is the best recipe that i ever had…..and it came out fantastic!!!! thanks alot for providing us such a perfect n clear recipe…done a splendid job!!! i can tell u…
usha says
Thanks Jayani
Santhosh says
Hi Usha, I ran into your site and tried it this weekend. It was just perfect! Thank You so much.
sindhu says
ooh...is it!!! every time i do i put some water as i bother about my pressure cooker...well...this time i will surely follow your instructions..thanks alot for ur immediate reply... if you have any other hyderabadi special dishes please let me now usha!! bye for now....have a nice day..
Sindhu says
Hey am having a small doubt in the process that is if I dont pour any water in the pressure cooker , will the bottom of my cooker burns? please clarify as soon as possible.....thank you
usha says
No. It will not burn. Meat will release lot of water when cooking. At least the meat that we get here in US does. If you wish, you can sprinkle a little water but from my experience, it is not necessary.
sindhu says
hiii....dear.. i tried many times to prepare hyd mutton biryani from many website it never turned in a better way, yours is the best recipe that i ever had.....and it came out fantastic!!!! thanks alot for providing us such a perfect n clear recipe...done a splendid job!!! i can tell u...
I am glad it came out well! 🙂
Vani says
can we cook the rice and the meat on the stove instead of bakin in the oven
Yes. You can cook it on stove top. Arrange rice and meat in layers, in a pot, just as mentioned in the recipe. Cook the it on stovetop, instead of baking. Cook on high for 5-8 minutes until the steam starts escaping from the lid. Reduce the heat to low and cook for another 15 minutes. Cooking time is approximate.
Sammy says
Hi i tried out this biryani today..it was toooo gud...thanks a lot for posting it..!!!!!
The Purple Foodie says
Marinated the mutton overnight and now I need to soak rice. How different are rice cooker measuring cups to regular measuring cups? Hope you answer real quick!
Not much. Rice cooker measuring cup is 160 ml and the regular measuring cup I think is 200ml.
Aarthi says
I tried this today and it came out fantastic! The proportions given are perfect! I only omitted safron + milk. Thanks for the recipe and keep up the good work!
notyet100 says
have published in my blog,..:-)thnks again for the recipe,..
I saw it on your blog and also left a comment... 🙂
notyet100 says
prepared tody it was yum,..thnks for the recipe,..had with onion cucumber raita and salad,..
I am glad you liked it. Thanks for letting me know.
notyet100 says
i was searchin for andhra style mutton biryani recipe and stumble on ur blog,..goona prepare this today,,.:-)
Vijay says
Hi Usha
I have tried making Mutton Biryani with raw meat but I have found that meat releases lots of water. Is there any way to tackle this while still cooking the authentic way?
Vijay
Swathy says
Hi Usha,
Your Biryani looks deliciously yummy! Tried it today though I cooked the rice until it was fully done. Otherwise it was perfect.
Thanks a ton! for this recipe.
Swathy,
I am glad you liked. It is encouraging when I get feed back from readers who have tried the recipes. Thanks a lot for letting me know... 🙂
Ramya says
Thanks for dropping by,n ur have yummy recipes yaar...
Thanks Ramya!!!
Mona says
Dear Usha, Your Biryani looks superb! Thanks for sending the entry.
Padma says
Such a delectable recipe for Hyd mutton biryani, Usha, I was always skeptical to make this. After looking at yours, its encouraging me.... thanks dear for this fab recipe
Try it out some time.... it is a little time consuming process but, compared to the amount of time you spend preparing/baking your lovely breads and rolls, this ain't that bad... 🙂