
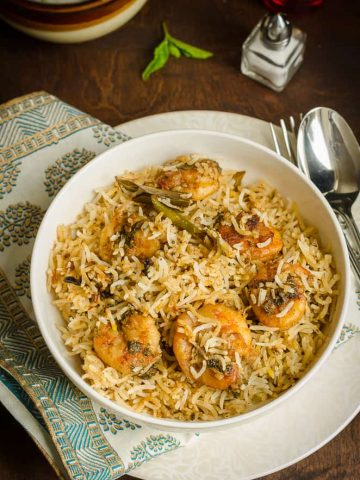
Egg dum biryani recipe with step by step instructions is a must try for egg lovers. Eggs coated with aromatic herbs & spices, cooked together with fragrant semi cooked basmati rice in dum style, is a wonderful treat for any day.

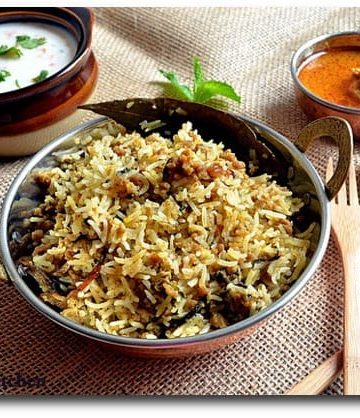
One of the delicacies from my home town is Hyderabadi biryani and today's recipe is Hyderabad style anda biryani. The more popular varieties are Hyderabadi Chicken Biryani and Hyderabadi Mutton Biryani but the anda version is equally tasty.
Preparation of anda biryani recipe is similar to pakki shrimp dum biryani. Since eggs are already boiled, prepare a thick base by roasting eggs in spices, tomato and yogurt. Then arrange egg base and rice in layers and cook on low flame in a tightly sealed pot.
Table of contents
Ingredients
There are 3 sets of ingredient list for egg biryani. List 1 is for the base or the egg curry. List 2 is for cooking rice and list 3 has rest of the ingredients required for preparation of dum biryani.
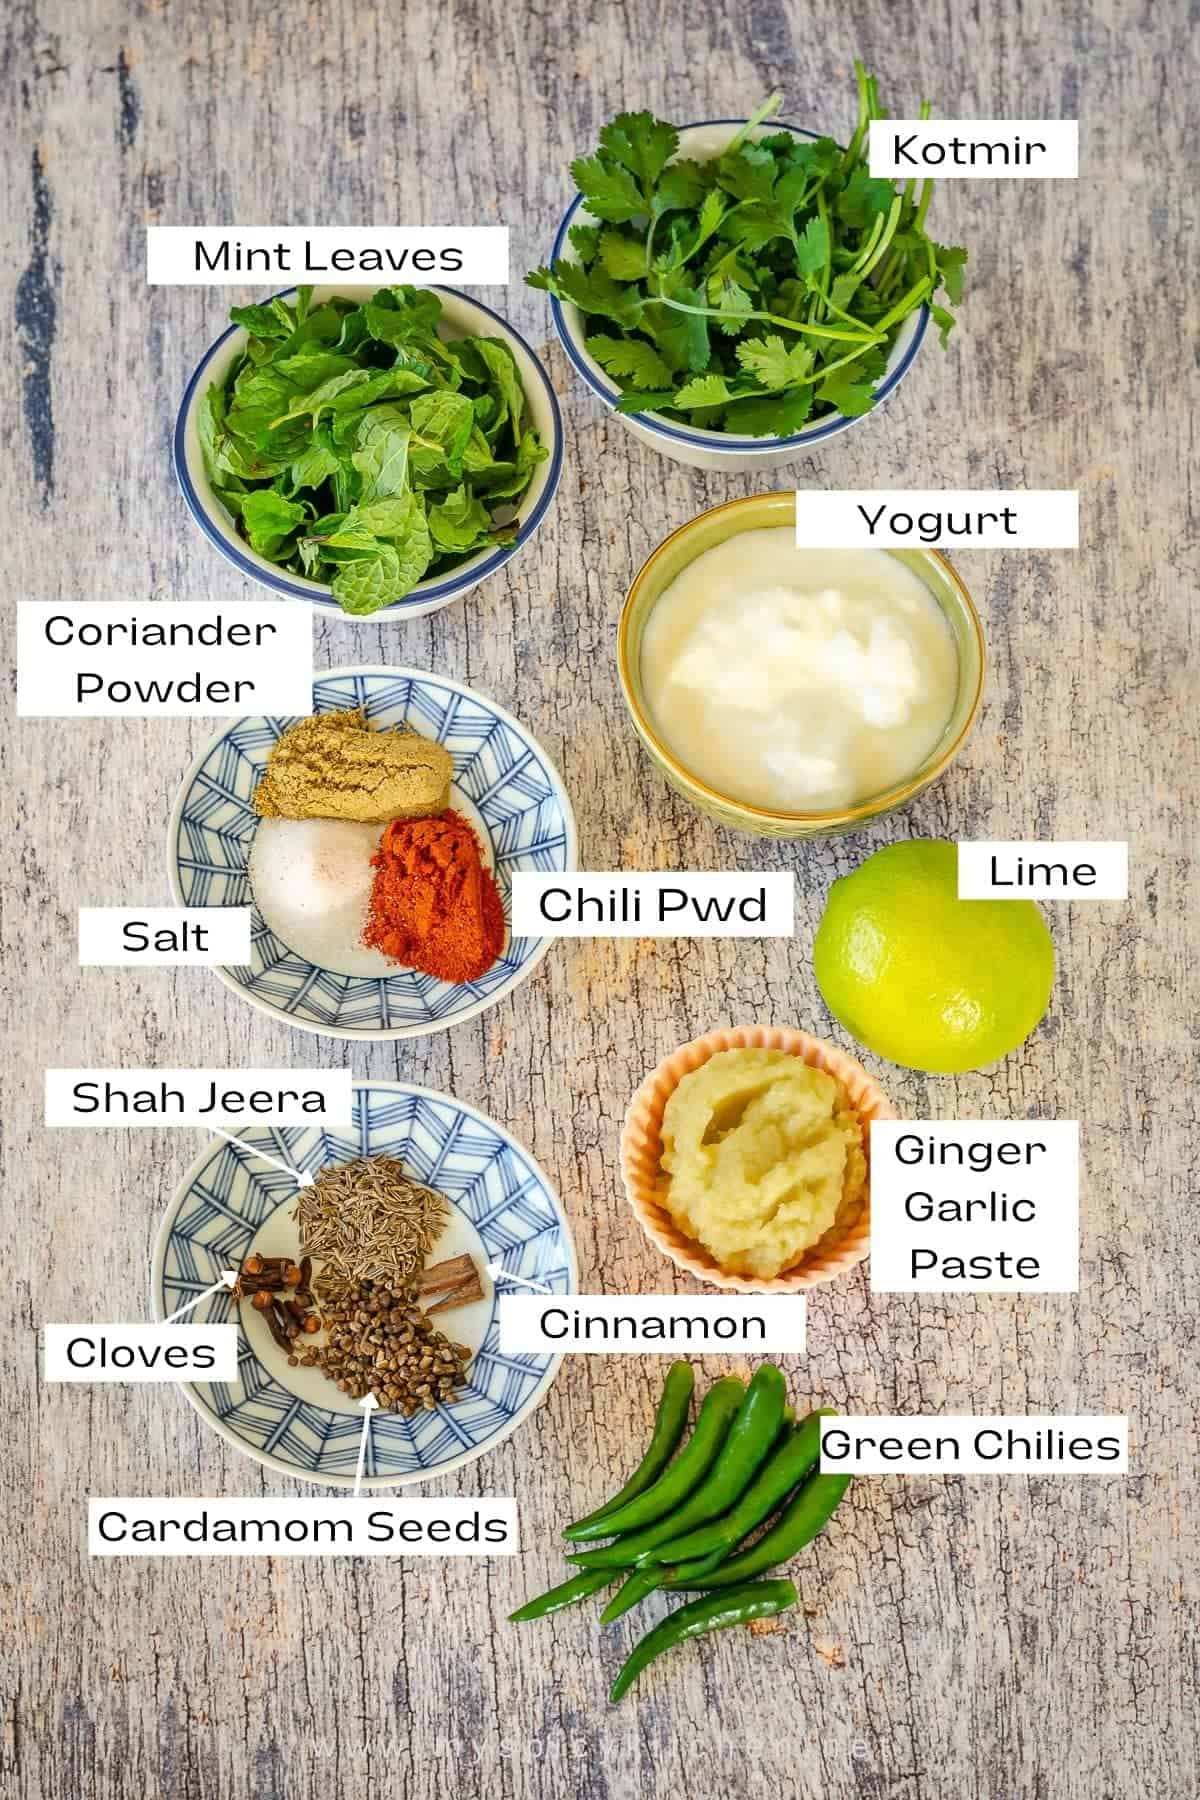
Egg Base
- Eggs - recipe calls for 8 eggs. Adjust the count based on your egg eating habit. 6-8 eggs are ideal for this recipe.
- Oil - Prepare with oil or half oil and ghee. We prefer oil and for some flavor and richness, add 1-2 tablespoon of ghee.
- Herbs - chopped mint and coriander leaves enhance the flavor of biryani.
- Green chilies & homemade ginger garlic paste.
- Spices - Use store bought biryani mix or a make it at home by blending together cardamom seeds, cloves, shah jeera and a small piece of cinnamon stick. You will also need some chili powder and salt to taste, and coriander powder.
- Yogurt - use thick yogurt. Sometimes I use ½ Greek yogurt and plain yogurt.
- Tomato - it is optional but I prefer as it gives some nice masala to egg base.
- Freshly squeezed lime juice.
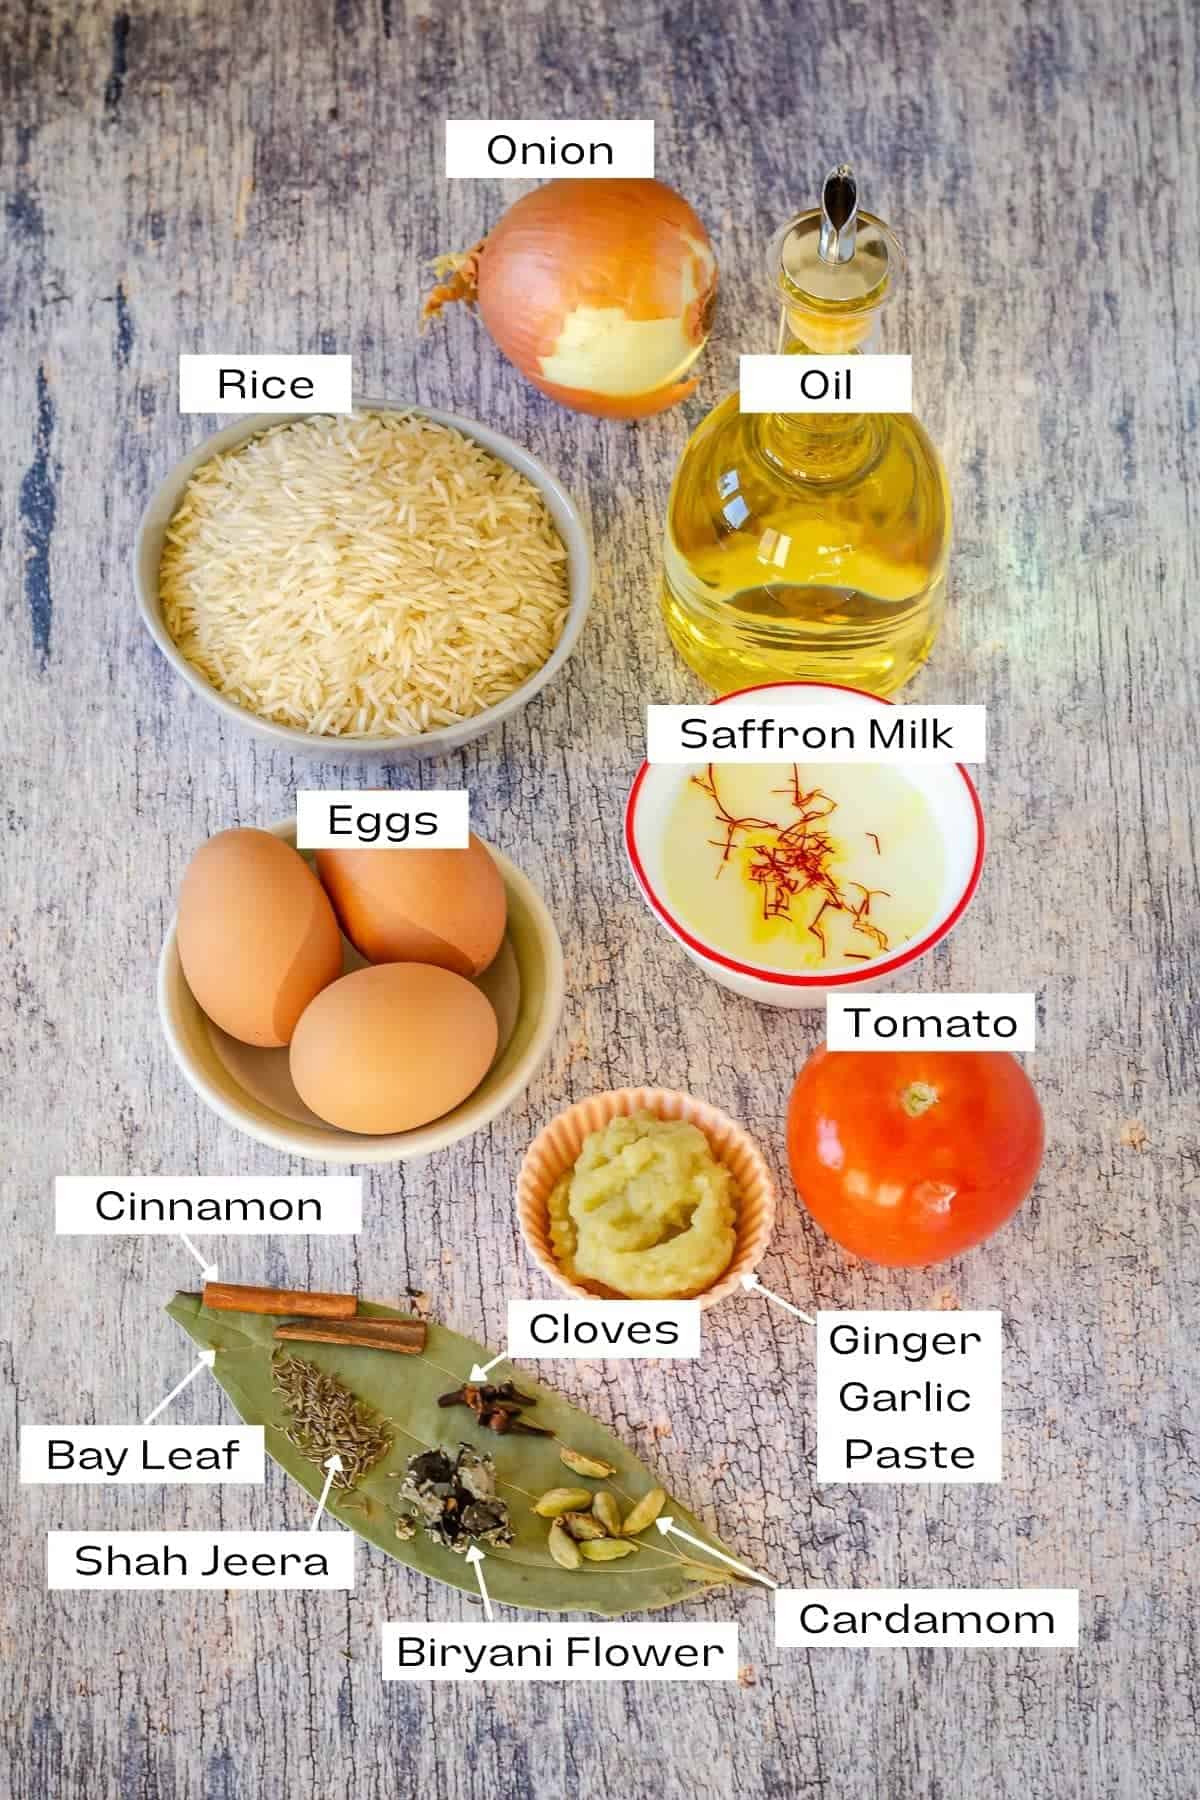
Cooking Rice
- Rice - use basmati extra long grain rice for nice texture and a long grain of rice.
- Whole Spices - Cardamoms, cloves, cinnamon, shah jeera, bay leaves and biryani flower for aroma. I get biryani flower from India. Skip it if you do not have it in your pantry.
- Herbs - chopped mint and coriander leaves.
- Oil & Salt - is for grainy rice texture.
Other Ingredients
- Onion - for frying.
- Saffron soaked in milk.
- Ghee or butter for some flavor.
Instructions
There are 3 components to egg biryani. Prepare an egg base or a curry, semi cook rice, arrange eggs and rice in layers and cook in a tightly closed pot on low flame.
Prepare Egg Base
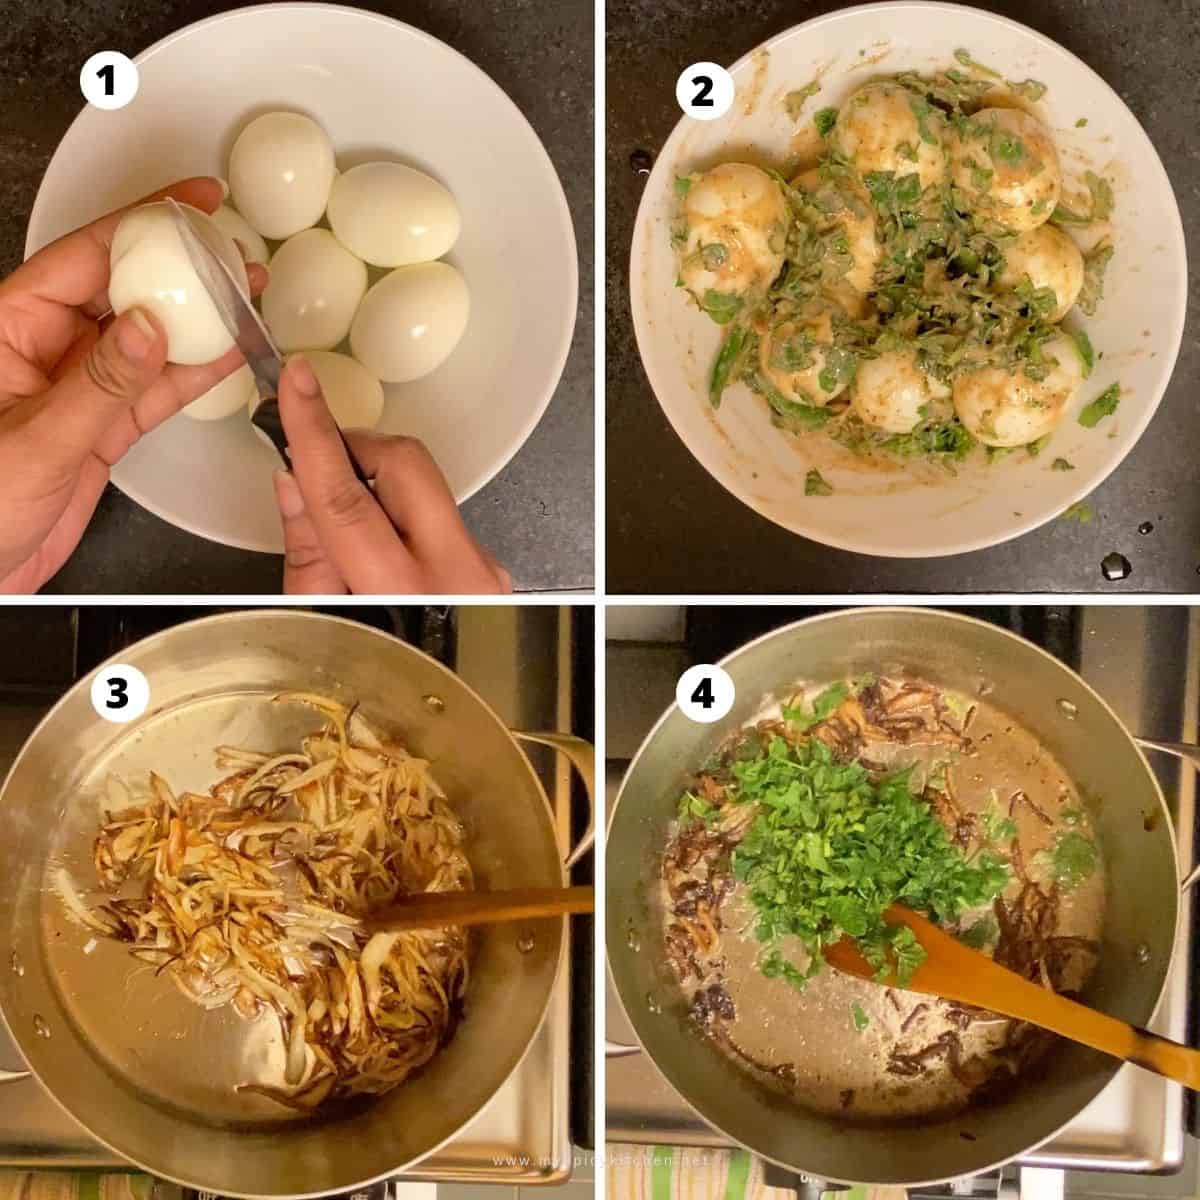
Hard boil eggs as you normally do, peel and make 4-6 vertical around the eggs (#1 in collage). Marinate eggs with salt and chili powder. Sometimes I marinate eggs in yogurt, little ginger garlic, chilies, coriander leaves and dry spices (#2). Choice is yours.
In a wide saute pan, take oil and fry sliced onions to light golden brown (#3). Take half the fried onions & half of the oil in a bowl and keep aside. Prepare the base by sautéing ginger garlic paste and mint in the same pan with remaining oil and fried onions (#4).
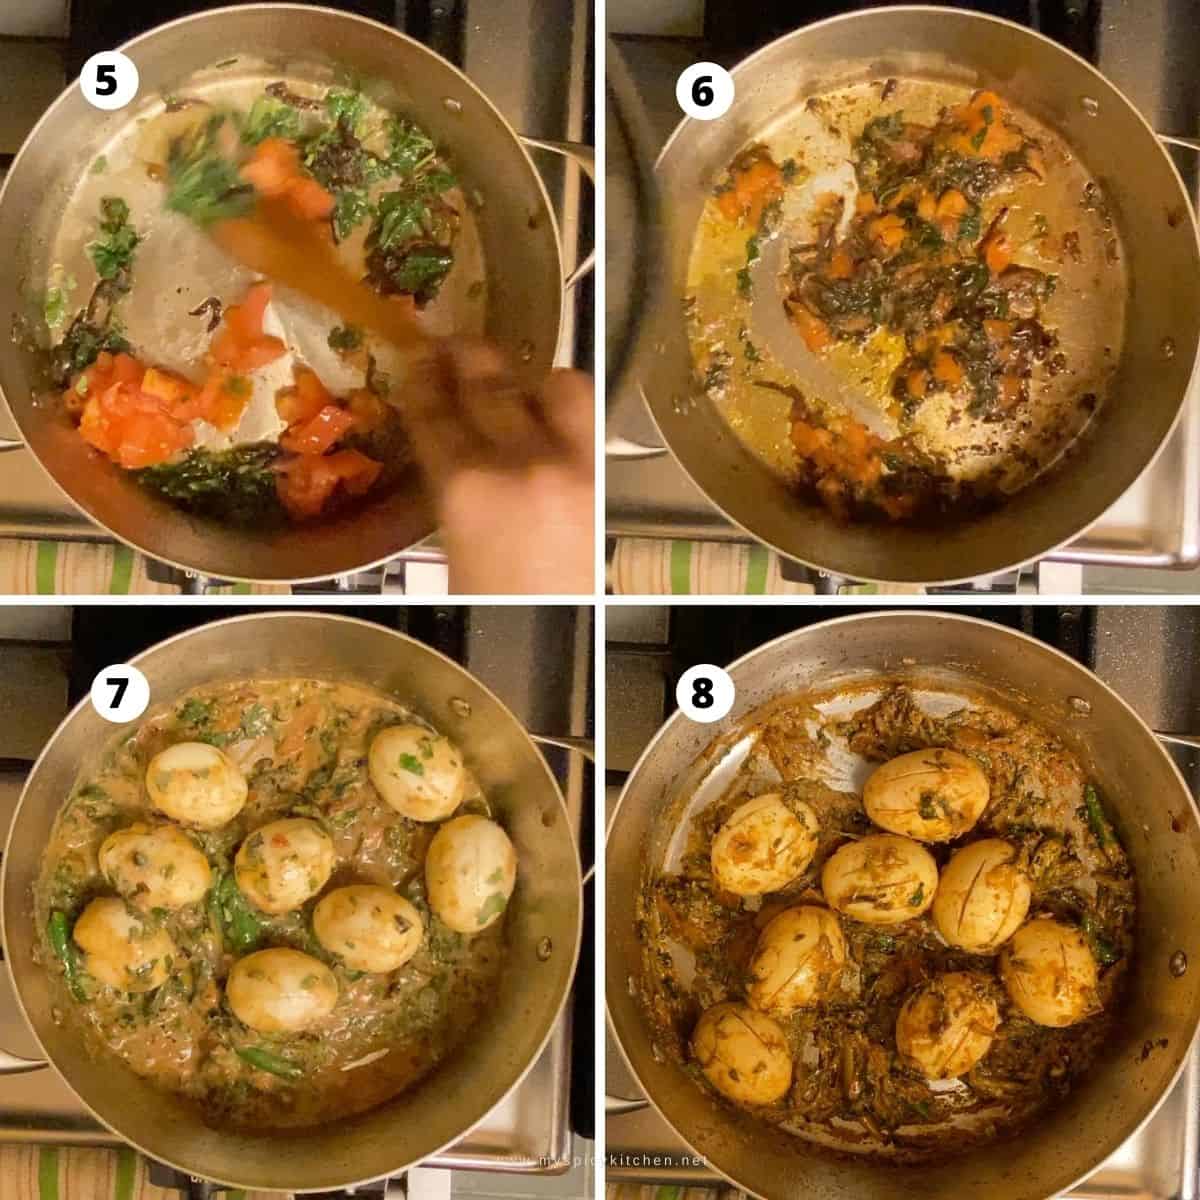
Then sauté chopped tomatoes (#5). If you marinated eggs with just chili powder and salt, add eggs & green chilies now, mix well, cover and cook until tomatoes are soft.
If you marinated eggs with yogurt, once tomatoes are soft (#6), reduce the flame, add eggs and stir quickly and this is very important (#7). Then increase the flame to medium cook until oil begins to separate and curry thickens (#8). Turn off the flame, squeeze lime juice.
Cook Rice
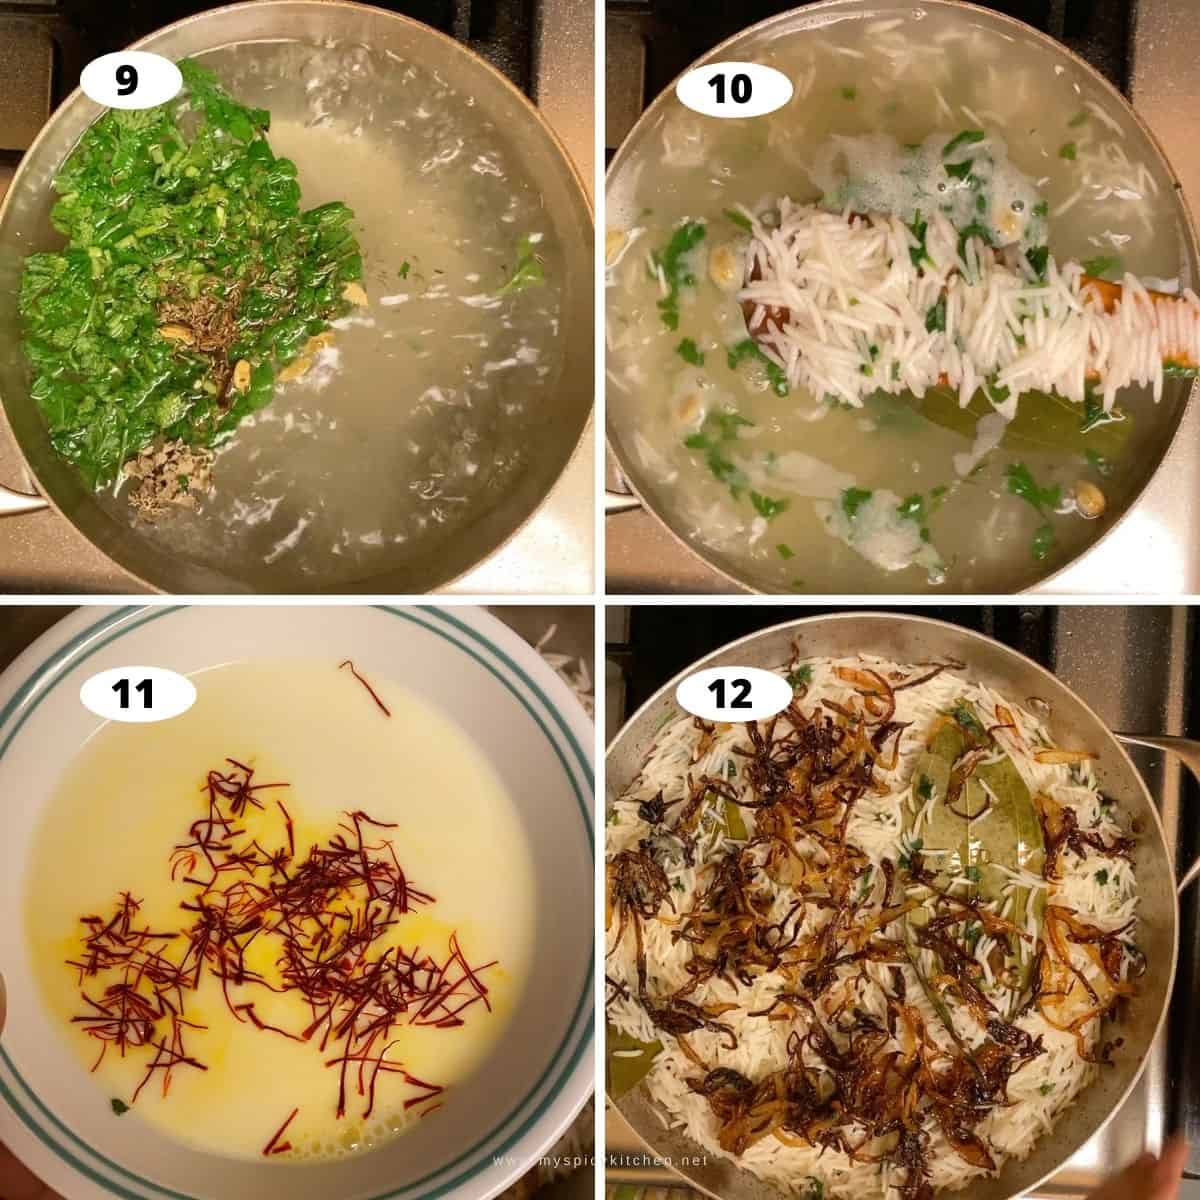
Wash and soak rice for at least 30 minutes. 10 minutes into soaking rice, bring a pot of water to boil. Add all the ingredients listed under cooking rice, except rice (#9). Then add rice and cook for 5 minutes on high flame (#10). Reserve a cup of water transfer rice to a colander. Rice should be about 60% cooked.
Assemble & Cook
Before you cook rice, prepare the curry and soak saffron in warm milk (#11). Once rice is ready, immediately assemble biryani for dum style cooking (cooking in a sealed pot by the steam generated).
In pan in which we cooked egg base, arrange rice on egg base. You can arrange rice in two layers are in one layer. Since this is a small quantity, I so only one layer of rice.
Sprinkle remaining fried onions, oil, saffron milk and ghee if using (#12). Cover the pan with 2 aluminum foils, close the pan with a lid and wrap the foil around the pan & lid, to seal any gaps in between.
Place heavy pan or weight on the biryani pan, cook on high flame for 3 minutes until steam is formed inside and can hear some sizzling. Reduce the flame to low and cook for 12 minutes. Turn off the flame and rest for at least 15 minutes before serving.
Serving
Serve biryani with your favorite raita, salan, chicken curry or mutton curry. I usually serve with onion raita, cucumber raita, spinach raita or tomato perugu pachadi (yogurt chutney).
Store
Store leftovers in the refrigerator for 2-3 days. Microwave and serve. We always find biryani lot tastier the next day. Flavors seep into rice and leftovers always tastes great.
Expert's Tips
- Rice - Use good quality extra long grain rice. I prefer Royal Chef's Secret Extra Long Grain Basmati Rice. For today's recipe I used Kohinoor Gold Extra Long Basmati Rice, which is also good.
- Cooking Rice - Key to a perfect biryani is the texture of rice. So it is very important to pay attention to rice when cooking. I usually put a timer on when I add rice to boiling water. This way I won't forget and end up over cooking.
- Do all the prep work such as preparing the egg base, soaking saffron in milk, and a colander or a strainer ready before cooking rice, that is before you add soaked rice to boiling water.
- Once you cook rice, immediately prepare the pot for dum style cooking, else rice will continue to cook sitting in colander from the steam.
- Under Cooked Biryani - Once you cook biyani let it rest for 15 minutes before opening the lid. Slowly open the lid from one side and check if rice us cooked. If it is under cooked, cover the pot and let the rice cook in the stream for another 5-10 minutes or as necessary.
- Over Cooked Biryani - There is no way to fix over cooked biryani rice. Next time adjust the cooking time accordingly. You can either reduce the cooking time of rice in 'cook rice' step or reduce the time when cooking in dum style. I would do the former.
FAQ
Yes you can. Take a cup of water in the inner pot of electric pressure cooker. Place a trivet or a streamer in the inner pot, arrange eggs. For perfect hard boiled eggs, pressure cook on manual/pressure cook setting for 5 minutes, release pressure after 5 minutes and place eggs in ice cold water for 5 minutes.
Yes you can cookk biryani in the oven. However, you still need to do all the prep work on the stovetop. The last step, 'assembling & cooking' can be done in the oven.
Prepare egg curry base and cook rice as mentioned. Preheat the oven to 400F. Then cook rice on stovetop for 7 minutes, almost 80-90% and then arrange eggs and rice in layers in an over safe baking dish. Seal it with aluminum foil.
Reduce the temperature to 350F and bake biryani for 20 minutes or until done. Temperatures of ovens vary from oven to oven, so first time you cook in the oven, check the rice for doneness before removing from the oven.


Detailed Recipe
📖 Recipe

Egg Dum Biryani
Equipment
- 1 wide 3 quart saute pan to cook biryani.
- 1 saucepan, 2 ½ - 3 quart in size to semi cook rice.
- 3 bowls to keep aside fried onions & oil, to soak saffron in milk and to reserve some water in which rice was boiled.
- 1 colander or strainer to put cooked rice.
- Aluminum Foil
- Heavy object like cast iron pans or exercise dumbbells
Ingredients
Egg Base
- 8 Eggs use 4 - 8 eggs depending on your consumption.
- ¾ cup Oil
- 1 large Onion sliced
- 1 cup Mint Leaves chopped
- 2 tablespoons Ginger Garlic Paste
- 1 small - medium Tomato, chopped approximately 1 cup when chopped
- 10 Green Chilies cut length wise
- ½ teaspoon Chili Powder
- 1 teaspoon Coriander Powder
- Biryani Masala ½ teaspoon Cardamon Seeds, 3 Cloves, small piece cinnamon, ½ teaspoon Shah Jeera
- 1 teaspoon Salt this is an approximate measure. I have not measured it. Adjust to taste
- ½ cup Yogurt
- ½ lime juice or 2-3 tablespoon lime juice
- 1 cup Cilantro/Kotmir chopped
Cooking Rice
- 3 cups Basmati Rice cup size - 180 ml
- 6 Cardamoms
- 4 Cloves
- ½ inch Cinnamon
- ½ teaspoon Saha Jeera/Black Jeera/Caraway seeds
- 2 Bay Leaves
- 1 Biryani Flower
Other Ingredients
- Few strands of Saffron
- ¾ cup Milk
- 1 - 2 Tablespoon Ghee or Butter
Instructions
Prep Work
- Boil eggs on stovetop or in electric pressure cooker such as Instant Pot (IP). In IP, take a cup of water in the inner pot, place a trivet or steamer, arrange eggs on it. Pressure cook on manual / pressure cook setting for 5 minutes, release pressure after 5 minutes and place in ice cold water for 5 minutes.
- Peel and make some slits on each egg or poke with a fork or a knife.
- Wash rice wash and soak for 30 minutes.
Egg Base
- Make slits on boiled eggs and marinate with salt, red chili powder, yogurt, little ginger garlic paste, chilies, coriander leaves and dry spices.
- Take oil in a pan and fry onions until light golden brown. Once onions are fried, take ½-¾ fried onions and ½ the oil in a separate bowl. Leave the remaining oil and fried onion in the pan.
- To the same pan, add ginger garlic paste, mint and saute for a minute. If you didn't marinate chilies with yogurt, add chilies now.
- Add tomatoes and cook until tomatoes are mushy. Reduce flame to low.
- Add marinated eggs and immediately stir. This is very important. Cook eggs stirring frequently on medium flame until oil begins to separate.
- Taste and adjust seasoning. Add lime juice, give a good stir and turn off the flame.
Cook Rice
- 10 minutes into soaking rice, boil a pot full of water in a 2 ½ - 3 quart saucepan or a pot.
- When water comes to a boil, add all the ingredients listed under cooking rice, except rice.
- Now discard water, add soaked rice and cook for 5 minutes on high flame. Basically, after adding rice, water should boil again and rice should roll over. This will take about 1 - 1 ½ minutes, and continue to boil for another 3 ½ - 4 minutes. I just put the timer and forget about it. And this is the most crucial step to get good, grainy biryani rice.
- Once rice is about 60% cooked, reserve some boiled water and dump rice in a colander or a strainer.
Arrange & Cook
- When is semi cooked, spread rice on eggs. Sprinkle fried onions, saffron milk, received water from cooking rice.
- For richer taste, pour 1 - 2 tablespoon of ghee as well.
- Cover the pan with aluminum foil, put on the lid, seal the pan with aluminum foil.
- Cook on high , for 3 minutes or until steam escapes from the pan, reduce the flame to low and cook for 12 minutes. Let it sit for at least 15 minutes before opening.
- Serve hot with your favorite raita or gravy.
Notes
- Measuring Cup – I used the measuring cup that comes with the rice cooker. 1 cup = 180 ml. All the cup measurements are with this cup.
- Rice – Use good quality extra long grain rice. I prefer Royal Chef’s Secret Extra Long Grain Basmati Rice. For today’s recipe I used Kohinoor Gold Extra Long Basmati Rice, which is also good.
- Cooking Rice – Key to a perfect biryani is the texture of rice. So it is very important to pay attention to rice when cooking. I usually put a timer on when I add rice to boiling water. This way I won’t forget and end up over cooking.
- Do all the prep work such as preparing the egg base, soaking saffron in milk, and a colander or a strainer ready before cooking rice, that is before you add soaked rice to boiling water.
- Once you cook rice, immediately prepare the pot for dum style cooking, else rice will continue to cook sitting in colander from the steam.
- Under Cooked Biryani – Once you cook biyani let it rest for 15 minutes before opening the lid. Slowly open the lid from one side and check if rice is cooked. If it is under cooked, cover the pot and let the rice cook in the stream for another 5-10 minutes or as necessary.
- Over Cooked Biryani – There is no way to fix over cooked biryani rice. Next time adjust the cooking time accordingly. You can either reduce the cooking time of rice in 'cook rice' step or reduce the time when cooking in dum style. I would do the former.
- Biryani in the Oven - Prepare the egg base and cook rice as mentioned in the recipe. In the last step of cooking in 'assemble and cook' can be done in the oven. Preheat the oven to 400F. In 'cook rice' step, cook rice for 7 minutes instead of 5 minutes until rice is almost 80-90% cooked. Then grease an oven safe long baking dish, arrange eggs and rice in layers as mentioned in the recipe. Seal the dish with aluminum foil.
Reduce the temperature to 350F and bake biryani for 20 minutes or until done. Temperatures of ovens vary from oven to oven, so first time you cook in the oven, check the rice for doneness before removing from the oven. - Nutrition - Values mentioned are approximate.
Nutrition
Like the recipe? Pin It for later!
Signup to the newsletter to receive latest updates from MySpicyKitchen.
This post was originally published in Nov 2008. It is republished with new content and images.

Radha says
Stunning pictures! I am sure this must be a comforting one as well as a crowd pleaser.
Harini says
Lovely presentation and I am in love with the Biryani masala you use. I know this combination of spices and method cannot go wrong.
Srividhya says
A delicious biryani for egg lovers. Loved your detailed procedure and amazing pictures. Really enjoyed all your three rice recipes Usha.
Kalyani says
as always, a classy looking pictures of the egg biryani Usha. the colours and textures are so pleasing to the eye, am sure it was absolutely tasty too!
Rinku says
This is beautifully presented and described. I need to make this tomorrow. Thank you for sharing.
Archana says
Usha! I love egg biriyani now I am craving some. The pictures are as usual beautiful and the recipe? of course, it is Usha's recipe it has to be awesome. Will try making this recipe sometime soon.
Seema says
I love how the rice is and the separate spiced grains look. the egg bum biryani is certainly a delightful recipe.
Jayashree T.Rao says
Biryani looks yumm and delicious. Nice pictures. Would love to try your version without paneer in it.
Mina Joshi says
Your biryani looks delicious. I love the way you have coated the eggs with the spices. The spices and the layering of rice makes it look restaurant style.
Neha says
This Egg Dum Biryani looks so appetizing. It is a good way to slit the eggs halfway for the spices to penetrate the eggs. Great post!
Sujata Roy says
Biryani is an all time favorite rice dish. And your egg Biryani looks so aromatic and mouthwatering. Loved your well explained recipe. A must try recipe. Can't wait to try.
Mayuri Patel says
I am a big fan of egg biryani and try to make it as often as I can especially when I am entertaining.Your biryani preparation has me craving for it. Like your idea of making vertical cuts on the eggs for the masala to go in and also to allow them to marinade. Will follow these tips when make it next time.
Priya Vj says
Biryani looks yumm and your recipe is a keeper for beginners who want to get the perfect dum.biryani . Well explained and detailed steps to get the biryani right
Shobha says
Egg dum biriyani looks super. Our family is a Biriyani lover and I shall also try your version.
Vaishali says
Beautiful pictures Usha! Even though I do not eat eggs, I can't stop admiring the biryani. The marinated eggs look so cool. With the perfectly cooked rice.
raj says
COuld you please update regarding the salt.
I always mess up adding the right quantity
MySpicyKitchen says
Raj, sorry for the late reply. I missed your message. Try about 1 tbsp. (tablespoon) of salt. I use morton iodized salt. To be on the safe side, try 1 3/4 tbsp. and adjust it accordingly.
Updated the recipe with salt requirements. Actually, I am glad you brought it up. I just realized that I did not even mention salt in the recipe..
Lakshmi Kalyani says
Usha, I just tried out this recipe and it came very well... should we add salt while cooking the rice? i did not add it, and it came out little bland due to it... thanks for the easy and yummy recipe!!
sneha jha says
God Bless you for this. I followed exactly the same steps and I ended up making it like a Pro...Here's a link to my photobucket picture of my anda dum biryani.
http://i1150.photobucket.com/albums/o604/Sneha_Jha/IMG_1360.jpg
thanks thanks thanks.
MySpicyKitchen says
Sneha, thanks for trying the recipe! The picture looks delicious!
sara says
i am sorry. u have changed the look of ur blog. i thought it was somme else copying ur blog
usha says
Sara, you almost gave me a heart attack with your earlier comment.. 🙂 I am not publishing that comment though..
Yes, I changed the look of the blog and I am not liking it very much. I think I will switch back to the old look.
sara says
thank you. but i am so fond of ur recipes that i was mad who couldnt see some else copying ur blog. anyway wanted to say that ur recipes are just superb and i have tried almost all biryani and shorva recipes and they have come excellent. my husband is an avid lover of eggs and he takes them very seriously..he loved the egg biryani i made using ur recipe. thank you so much
Neeta Nadkarni-Karjodkar says
Hi there.......your egg biryani recipe is just gr8.I tried out the the recipe with some variations (hope you dnt mind that!).But still credit goes to you for such gr8 recipe.
usha says
Hi Neeta, I don't mind it at all... i am glad you liked the recipe! Let me know the variations so that I will try it too, the next time I prepare it.
subrata kanta says
Looks great the colour of Biryani. Tonight I am
going to cook exept Biryani flower,not available in Dubai and let u know the Taste
Thanks for recipe
I usually bring it from Inida. You can omit it.
Anita says
Is "Biryani flower" the same as "star anise"?
Anita, Biryani Flower is not Star Anise. I get it from India. I have not seen it in Indian grocery stores in the US. It is used a lot in India to make biryani. You can omit this ingredient if you don't have it. It looks like this
indosungod says
when is the mint added, I guess it is added after the green chilies?
You can add it with the green chillies. Thank you for bring this to my notice. I had not realized that I forgot to mention it.
Shruthi Hebbur says
I tried this today. it came out awesome USHA. Thank u
Thanks for letting me know.
sunita says
Hi there,
Thanks for the commment dear.I am glad you liked my art work.
Your blog is tooo good grl. Everything is sooo perfectly arranged ,and yes yummy food...will sure try some recipes...
Thanks Sunita!
Mona says
Looks exotic!
Ramya says
As I said, I tried this Usha. Its simple and simply tasty. We enjoyed it.
romaspace says
biryani looks exquisite !
Ramya says
Wow looks great will sure try this
romaspace says
Nice looking biryani. Patiently cooked to perfection!
Ramya says
I really really gt tempted and i am gonna try this for tmrws lunch and will keep u posted..Thanks for sharing 🙂
varsha says
Looks absolutely divine..I love eggs..:)