
I am again late posting my Home Bakers Bake for this month. It has become a pattern. This time I did bake by 12th of the month but just did get to put it up on the blog. But, we do have 2 weeks time to update the blog, so I am still with in the extended deadline.

Anyway, the bake for this month was Biscotti. Priya, the brain child of this event gave us 4 options, 2 savory and 2 sweet biscotti choices. I chose the sweet ones and made these American style biscotti with pistachios and raisins. Biscotti is an Italian biscuit or cookie, which are baked twice. I baked almond chocolate chip biscotti already and this time thought of making the savory ones. But the my sweet tooth pulled me towards these sweet ones.

Since I already made the biscottis with almond and chocolate chips, I wanted to use different nuts. All I had at in my pantry were pistachios and raisins. So I went ahead and used these. And I like nuts & dry fruit biscotti better than the plain ones.
Source: King Author Flour
Total Time: 1 - 1 ½ hours
Preparation: 15 - 25 minutes
Baking Time: 44 - 60 minutes
Yields: 30 - 40 Biscotti
Ingredients:
- 6 tbsp. Butter (I used unsalted but salted can also be used)
- ⅔ cups Sugar
- ½ tsp. Salt
- 2 – 3 tsp. Vanilla Extract
- ¼ tsp. Almond Extract (Opt.)
- 1 ½ tsp. Baking Powder
- 2 Large Eggs (I used room temperature eggs)
- 2 cups Unbleached All-Purpose Flour
- ⅓ cup Pistachios chopped (I chopped each nut into 2-3 pieces)
- ⅓ cup Raisins
- Coarse White Sparkling Sugar for sprinkling on top (opt. I did not use it)
Preparation:
- Pre-heat the oven to 350 F.
- Lightly grease a large baking sheet or line it with a parchment paper. i greased the pan.
- In a medium bowl beat the butter, sugar, salt, baking powder, vanilla extract and almond extract (if using) until the mixture is smooth & creamy. I used my hand held mixer. This would take about couple of minutes.
- Beat in the eggs. The batter will look slightly curdled and that is ok.
- At low speed of the mixer (I used fold mode), add the flour, nuts and raisins. I folded in ½ the flour, then the nuts & raisins and lastly the remaining flour. Fold in until all the flour in blended into the egg mixture and smooth dough is formed. The dough will be sticky.
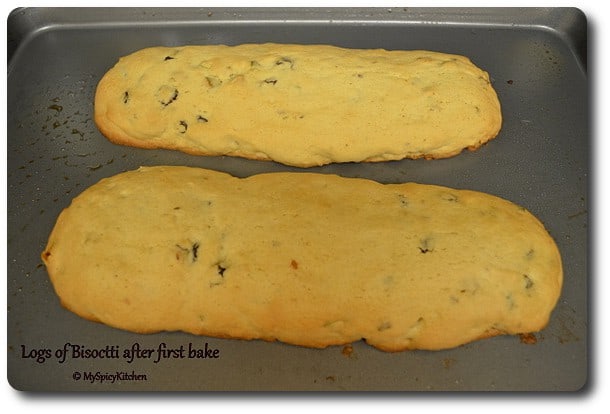
- Divide the dough in half and place it on the baking tray. Shape the dough into two long logs, about ¾” tall. I think the width and length should not matter but the recipe says shape the dough into two 9 ½" x 2" logs.
- Bake the logs for 20 -25 minutes in a pre-heated oven, on a middle rack. I baked for 25 minutes and my logs were light golden brown. I felt I should have removed those 2-3 minutes sooner.
- Remove from the oven, using a bottle spray filled with room temperature water, spray lightly on the log. If you don't have a bottle spray like me, sprinkle some water on the logs and rub the logs with fingers to evenly cover dampen all sides of the log, as well as the top. This will soften the crust and will make it a bit easy when slicing the biscotti.
- Reduce the heat for 325 F.
- Wait for 5 minutes and using a sharp serrated knife, slice each log into ½” to ¾” slices. When slicing, make sure to cut straight up and down, perpendicular to the surface. If the biscotti are cut unevenly, biscotti may be thicker at the top than the bottom.
- Place the biscotti on edge on the baking sheet and bake them again for 25 – 30 minutes until they feel dry and begin to turn golden brown. They will still feel a tiny bit of moist in the center but that is fine. The biscotti will continue to bake as they cool. I placed the biscotti sliced or cut side down on the baking sheet for 12 minutes, turned them around and baked for another 12 minutes. But 10 minutes on each side probably would have been better. Check the notes below for the second bake.
- Remove the biscotti from the oven; transfer them to a rack to cool. Once the biscotti cool, store them in an airtight container at room temperature. They stay good for few days.
Notes:
- I used ⅓ cup pistachios and ⅓ cup raisins and felt I could have added few more pistachios. I had only few unsalted roasted pistachios. I used that and the rest, I used slated pistachios. I was afraid I might make the biscotti salty if I added too many salted pistachios hence used only ⅓ cup. The recipe says we can add up to 2 cups of nuts and dry fruit combined.
- Other combination of nuts and dry fruits that could be added are; almonds & cranberries, dry apricots and almonds, almonds & chocolate chips or any combination of dry nuts and dry fruits of choice.
- Second Bake: The recipe said place the biscotti on the edge on the pan and bake them. I was confused and did not quite understand what it meant and how to place them. Now that I read it again, I think I should have placed the biscotti on the edge of the pan and then baked. Anyway, what I did was, I placed the sliced (cut) side of the biscotti on the pan and baked it for 12 minutes. I was still confused if that is how I was supposed to bake. I pulled out the biscotti, turned around half of the biscotti and the other half of the biscotti, I made them stand, the bottom side on the sheet (that is, the side of the biscotti that was the bottom of the log during the first bake) and baked them for another 12 minutes. The biscotti that were standing were perfectly baked and the ones with sliced side facing the tray were a bit burnt. So depending on how you place the biscotti, the baking time varies. If placing the sliced /cut side down on the sheet, then bake for 10 minutes, turn them around and bake for another 10 minutes. If you place the biscotti in a standing position, bake for 12 minutes turn them around and bake for another 12 minutes.
- The another way of placing the biscotti during the second bake is, place them on a rack and put the rack on a baking sheet and bake them 20 - 24 minutes. No need of turning them around. I read this here after I baked my biscotti. This way the biscotti will be evenly baked.
- Also do remember that temperatures vary from oven to oven.
Related Recipes
Signup to the newsletter to receive latest updates from MySpicyKitchen.

Pavani says
Yummy looking biscotti.