
Before I get to today’s topic, let me apologize for posting late. I was busy the last 2-3 days and could not update the blog. For the day two of “behind the scenes of my food pictures”, I had planned to do food styling but I do not have all the pictures for the post. I will do lighting instead and get to food styling later.

Photography is all about lighting and how we manipulate it for our photos. I always take my food pictures in natural light and never use flash. Fortunately, my apartment is well ventilated and get plenty of sun light all though the day except my kitchen which doesn't have a single window. In fact, I need to switch on the lights all day in my kitchen. During my early days of blogging I use to chase the light in all the rooms and take pictures only where there was plenty of direct sunlight. Although light is important for good food photos, direct sunlight can result in over exposed photos with harsh lighting. Although I read about harsh lighting, there was very little I could do in terms of manipulating the light with my P&S camera. It was only after I learned to use my DSLR effectively that I learned a few tricks to use all that natural light to my advantage in my food photography. Now, I do not run around the house chasing light and I take most of my photos in my guest room and sometimes in my living room.
My Home Studio: My guest room is where I take most of my photos and depending on the time of the day, I take pictures in different parts of the room. I have two windows in the room. Most of the pictures are taken on the study table by one of the windows and also in the other window next to my bed. On the study table I use side lighting and when taking pictures in the window by the bed, I use back lighting. When I am really in a mood to play around with the camera and manipulate the light, I take pictures on the floor, which I like the most as I can sit down and comfortably play with the camera.
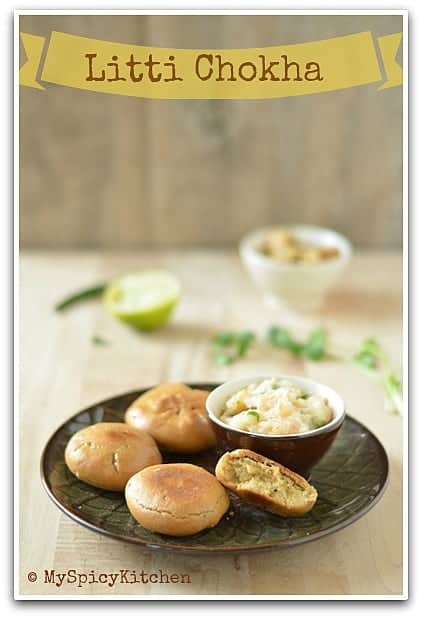
I took the above Litti Chokha photo on my bed. Wish I had taken behind the scene pictures to show you how I did it. There is lot of furniture in the bedroom and I usually do not have much room to work around and prefer the floor shoots as it is more comfortable for me but I do that only when I take picture in the afternoon.
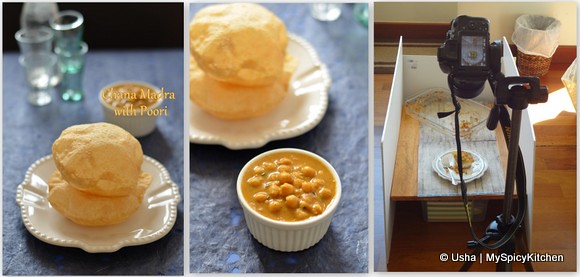
Photos for chana madra post was taken on the floor with back lighting. Just for my convenience, it was not completely on the floor. I placed the board on a box to give some height as that would be easy for me to sit on a step tool to take pictures.. 🙂 The behind the scene shot in the collage above is of kanfeh, where I used a similar setup as I did for chana madra. The difference being, I used a black board instead of a white board to manipulate the light coming from the back. Also, the direction of the light is different. I do not have behind the scene shot of chana madra pictures but will discuss how I took it later when I talk about back lighting.
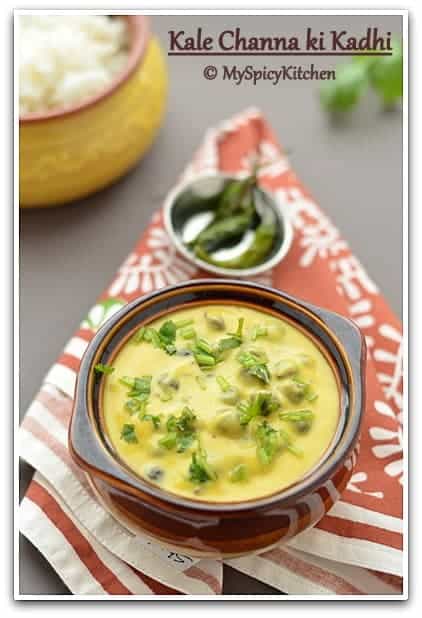
I also like taking pictures in my living room as it is spacious but I am lazy to carry all my stuff back and forth and end up using the guest room the most. Also, since I shoot indoors, I open all the windows in the room to let in as much natural light as I can. Until up to 8-9 months ago, I rarely took pictures on cloudy days but nowadays I do not planning my blog cooking depending on the weather. Though sunny days are the best to take pictures with plenty of natural light, cloudy days are not that bad either, if we can manage to use the available light effectively. The kala channa ki khadi was taken on a cloudy & rainy day. I have not really worked much on moody shots but cloudy & rainy days would be an ideal conditions for such shots.
Types of lighting:
Depending on the direction of light, there are three types of lighting; back lighting, side-lighting (right or left) and front lighting. Front lighting is where the light falls on the subject and the camera will be in between the subject and the source of light. I have not used this type of lighting in my food photography. And to be honest, I am not sure how this type of lighting works in food photography.

Backlighting – is one of my favorite types of lighting for food pictures and have taken so many photos with this type of light. The source of the light will be from the back of the subject, facing the camera. I use this lighting when I take pictures in the window near the bed. I usually cook in the evenings and by the time I am ready for a photo shoot, the sun moves away from the guest room. To get as much sunlight as possible, I set up my shoot in the window and end up taking backlit pictures. Actually, it would not be exactly backlit but between backlit and side-lit. Since the source of the light is from the back, this type of lighting is also referred to as 12’ clock lighting. Goat meat kalia picture is a good example of 12'o clock lighting or back lighting.
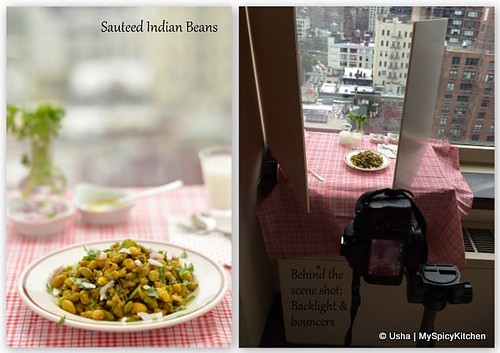
The above sauteed Indian beans picture was taken on a cloudy/partly day with back lighting. The light was coming from the back and the sun blocked by the clouds was between 1 - 2 o' clock direction. I used reflectors on both sides.
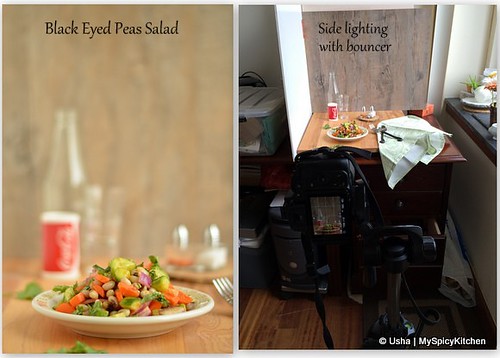
Side Lighting – is when the source of the light is coming from the side, either right or left. Depending on which side it is coming from, it is also referred to as 3 or 9 o'clock lighting. In below black eyed peas salad I used side lighting from the right side and it is also called 3 o'clock lighting. The lighting in litti chokha picture is also side lighting but from the left side and hence the light was coming in from 9 o'clock direction.
Manipulating Light:
As I mentioned earlier, too much light and direct sunlight can result in over exposed photos and photos with shadows. Diffusers can be used to diffuse the harsh direct sunlight and reflectors or bouncers to manipulate and bounce the light onto the subject. I have been reading about diffusers and bouncers since I got interested in food photography, soon after I started bogging. I only understood how they work few months ago. I use foam board as my reflectors/bouncers and piece of cloth as diffusers.

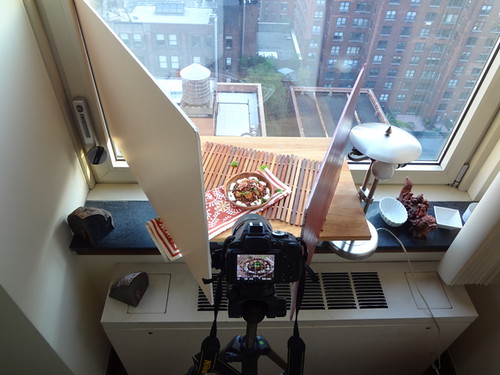
Diffusers - Taking pictures under direct sunlight can result in dark shadowed pictures. The light can be diffused using simple velum paper, a piece of fabric, curtains and blinds. I use cotton fabric as my diffuser which I got from India. I got it to use as a background for the photos but also use it to diffuse light. Since my intention was to use it as a background, I bought 1 meter white 2/1 fabric (this type of material is called 2 by 1) and 1 ½ meters of same fabric in black. The first time I effectively used a diffuser was with black fabric for vegetable muffins in the above picture. I rather say, the first time I noticed the difference in my pictures with and without diffusers was in this picture. Putting up a diffuser with a fabric is a bit cumbersome and hence do not use it that much. I just place my setting away from where these is direct sunlight.

In the above picture I used a white fabric and put the fabric so high that it diffuses the light that was directly falling on my set up. If you pay close attention to the middle picture, you can see a line of light falling on the set. By the time I put up the diffuser, adjusted my camera settings and my styling, the sun moved resulting in a line of light. I had to adjust the diffuser. The middle picture is the setup for an overhead shot and for the first picture, the behind the scene shot is the third picture. I use a clear tape to stick the fabric to the window. My friends and family, if you have seen tape marks on the window in the guest room, it is because of the diffuser I put up for my pictures.. 🙂
Reflectors - Reflectors or bouncers can be used to reflect and bounce the light on to the subject. I did not understand or notice any difference in my photos that were taken with or without the bouncer until this pressure cooker cake photo shoot. Once I noticed the difference, I started using it and use it for almost all of my photos. I do not know if I use the reflectors properly but it seems to work out fine for now. I have seen people using small cards or boards to bounce the light. I use foam boards and use boxes, books, lamp and even a desktop to put up the bouncer. I use anything that works.
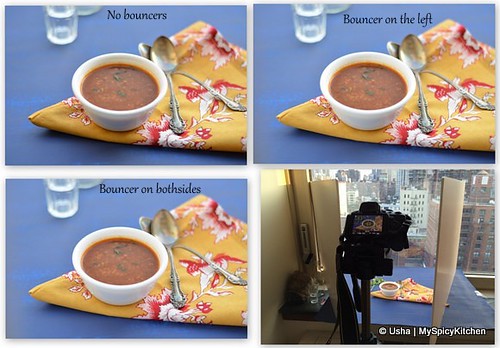
In the above picture, I do not know if one can notice the difference in pictures with or and without bouncers. Look at the bowl in the first picture of the above collage, the side facing the camera. A dark shadow can be seen on outer surface of the bowl. In the second picture with one bouncer, the shadow is lighter but can still see it. In the third picture with both the bouncers, the shadow is very light and not that visible.
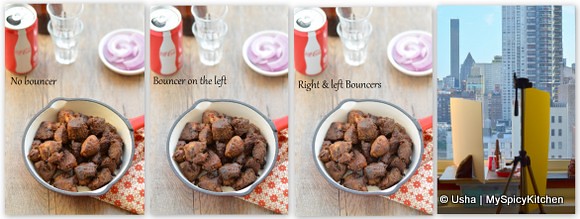
Similarly, if you look closely in the above pictures, the bouncers fill in the light evenly on the food in the pan to remove any light shadows.
More about manipulating light:
As promised, will discuss more about the chana madra pictures. I do not have behind the scene shots but these noodles set is the closest to chana madra shoot set. These pictures were taken near a window, on the floor with setup board placed on a box. Placing the board was for my convenience.
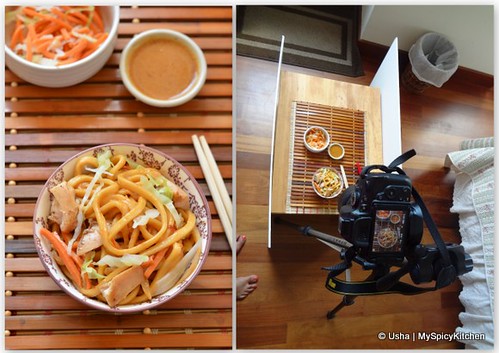
In the above picture, I did an over head shot. It is not exactly top down, 90 degree angle top down shot. As I mentioned in my first post, there are limitations to the angles we can take with a tripod and this is one. I can not do 90 degree angle shot with it. I need to buy an arm extension for the tripod to get that angle using a tripod. Since my backdrop is not visible in this shot, I did not put any board behind the food and let the back light coming form the window fall on the setup.
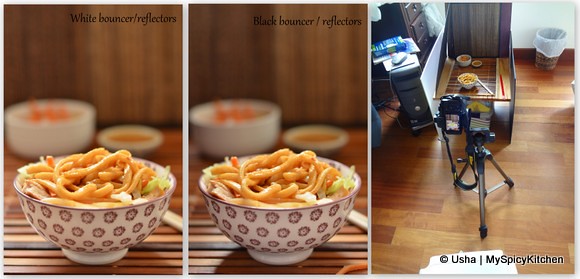
I changed the setup a bit as I wanted a backdrop. I used a place mat as a backdrop as I do not have a brown board. I first put a foam board behind and then place the place mat before it. Basically I used the foam board to support the place mat. The place mat serves as a back drop and also to control the light that was falling on the food. In the collage above, for the first picture I used white foam boards on both sides as bouncers just like in the over head shot. In the second picture of the collage, I used black bouncers on the sides and the behind the scene shot is that of the middle picture. I have one black foam boarded which is the right bouncer in the scene and for the left side, I placed a black board. The left side bouncer is higher than the bouncer on the right. For the first picture I used two white bouncers of same height. If you notice the bowl of noddles, the first picture does not have a shadow of the bowl and the middle picture does. That is the because how the bouncers were put up and the light coming in. I did not want that shadow in the middle picture but did not notice it until I downloaded the pictures on to my laptop. I used a similar setup as the noodles for chana madra. I used white bouncers of same height on both sides and since I did not need a backdrop with height, I just used a board that was 3-4" above the setup to manipulate and block the light from falling straight on the poori and bowl of madra.
Above shot is the behind the scene picture of lentil salad.
Happy clicking!

Cherie @ FoodRecipesEasy says
Good informative post with pictures. This is really awesome. What material could be used as the reflector?
MySpicyKitchen says
You can use a cardboard, foam board or you can even wrap a cloth or aluminum foil to a book or wooden board to use it as a reflector.
Harini says
OMG! You have taken up so much of your time in coming up with this post, Usha. Thank you so much for the in depth explanation!
denise says
Great post Usha. very informative. living in a city that is cloudy or rainy almost all the time, lighting is one of my biggest challenges. thanks for all the tips n tricks
kurinji says
really awesome and excellent post dear....
Srivalli says
Usha, that's really such a fantastic post..so much background and supportive posts you had to do for this post..simply love this one..so much information that one has to really read it couple of times to take in all the details you have given. Thank you so much for all the hard work!
Pavani says
Awesome post Usha. Kudos to you for taking time and explaining so much about lighting and how to manipulate it. Very helpful and informative post. Thank you.
Priya says
Mindblowing, i have loads of problem with lighting, this page is a treasure for me, thanks sharing many interesting points with us.